The process of cooking barbecue on an ordinary iron grill is well known to everyone. But in windy weather or during a sudden onset of rain, frying meat becomes problematic, if not impossible. It is much more convenient to make a shish kebab or barbecue on a stationary brick grill located under a canopy. In this case, sudden vagaries of the weather will not spoil your plans. This material will tell you how to make a street grill out of bricks with your own hands.
Schemes of stationary brick grills
Differences between foci located on outdoors, from traditional brick ovens are as follows:
- a brazier or barbecue is built in order to create comfortable conditions for preparing various dishes in the open air;
- the design of a street barbecue is much simpler, and the requirements for materials are not so high;
- a simple brick street stove can be folded at home or in the country by almost every homeowner;
- the dimensions and arrangement of the barbecue are chosen arbitrarily depending on the wishes and capabilities of the owners of the house.

All these features, and even the construction of the foundation in the yard, somewhat simplify the work on laying barbecues, it is a little more difficult to build outdoor garden ovens. The latter are small furnace complexes, where you can not only fry a barbecue, but also cook a variety of foods. But first, we will consider the simplest version of a stationary barbecue, which does not even require a solution.

The structure shown in the photo is being erected in literally half an hour on any level ground. To fold 4 supports, any brick will do, as long as it is even. The height of the supports is arbitrary, according to your height, so that it is convenient to cook. Then a slab is placed on top, preferably made of a fire-resistant material such as concrete or minerite. Further, the bottom of the red brick is laid (it can be hollow), and then the walls are erected according to the usual technology with dressing.
This design is good in that it does not require mortar, it is quickly erected and transferred from place to place. In addition, the height and size of the barbecue is at your discretion, but within reasonable limits, so that the structure is stable. Do not forget to install a metal brazier on the brick bottom, and make small cracks in the masonry for air access.
A small brazier of this kind can also be built on a solution by attaching a metal smoke collector on top in the form of an umbrella. Thanks to this, the smoke during cooking will not scatter in different directions and get into your face. Below is a diagram of a brick barbecue with a concrete slab overlapping and an exhaust hood:

There is only one difficulty in erecting this structure - pouring a concrete slab. But if available in household small scraps of plywood or OSB, and wooden blocks, the issue is resolved quickly enough. Racks are made of bars, and formwork panels are made of plywood. So that milk does not flow out of the concrete and the plywood does not get wet, the inside of the formwork must be covered with plastic wrap before pouring. It is also necessary to place a mesh of reinforcement with a diameter of 10-12 mm there. The figure shows a diagram of the formwork device and the order of the barbecue:

The smoke collector is made of galvanized steel roofing and is attached to the top of the barbecue. It is not recommended to light a fire directly on a concrete slab; it is better to adapt a metal brazier for this purpose.

Street oven complexes
The next option is a barbecue oven with a chimney and additional cupboards for kitchen utensils. The mouth of the firebox and the openings for the lockers are conceived with arched vaults, the niche-firebox - with the usual overlap of bricks laid on steel corners. Below are the drawings for a brick barbecue and ordering for its construction:

As can be seen from the procedures, the inside of the firebox is made of fireclay bricks, which means that it does not require a separate brazier. The height of the chimney is arbitrary, depending on the location of the stove and the height of the canopy above it.

The last option that we want to present is a more complex outdoor stove for summer cottages. This will require some experience and knowledge of stove business. The oven is designed not only for cooking kebabs, but also for cooking food, since it is equipped with hob... In this case, the device of an outdoor stove provides for the presence of smoke circulation and requires more materials and accessories:
- solid ceramic bricks - 450 pcs.;
- hollow red brick - 180 pcs.;
- fireclay bricks - 201 pcs.;
- cement grade 400 - 200 kg;
- fireclay clay - 40 kg;
- sand - 0.1 m3;
- corner 40 x 40 mm - 4 m;
- cast iron plate 710 x 410 mm;
- firebox door 410 x 410 mm - 1 pc .;
- gate valve - 1 pc .;
- cleaning door 140 x 140 mm - 1 pc.

Here, the internal parts of the furnace, exposed to an open flame or high temperature, are laid out with fireclay bricks. It is necessary to start preparation and construction by examining the drawing of a brick barbecue, which shows the sections of the furnace and its orders:

Required materials for construction
In our case, the main building material is brick. When building simple barbecues, the requirements for it are low. The chamber where it is planned to place the brazier should be made of red ceramic bricks, maybe even hollow. As for the lower support part, here the choice of material is entirely at your discretion and capabilities. The task of this part is to maintain the structure, it is not exposed to high temperatures, which means that it can be made of any suitable material.
If a simple street grill made of bricks, made with your own hands, has an unprepossessing appearance, then it can always be plastered or overlaid with inexpensive porcelain stoneware, but only after the masonry mortar has dried completely.
Brick street ovens are another matter. Here you must follow all the rules of the art of stove and use high-quality material. For construction, you will need a solid red brick without cracks and damage, the same applies to fireclay stone. The mortar should be used only sandy-clay in proportions 1: 1, and for refractory masonry - a solution of fireclay clay. Such dry building mixtures are commercially available.
Advice. For laying simple barbecues, 20% M400 cement can be added to the sandy-clay mortar for strength.

Any garden stove or barbecue is installed on a solid foundation, so you need to stock up on sand, cement and crushed stone for the foundation. Do not forget about the tools necessary for masonry work, and for the arched vaults you will need special templates - circled. They can be cut from drywall.

Laying the foundation
The foundation device is a rather complicated matter and requires geological exploration of the composition of the soil. But the construction of a hearth in the courtyard should be approached a little easier and at a lower cost. The universal recipe is a reinforced concrete slab. Its filling is performed in the following sequence:
- dig a hole 30 cm deep and 10-20 cm larger than the future stationary barbecue;
- tamp the bottom and cover with rubble 15 cm;
- install the formwork, protruding 10 cm above the ground level;
- cover the pit along with the formwork with plastic wrap;
- tie a mesh of reinforcement with a diameter of 12-14 mm with cells of 150 x 150 mm. Lay it on the bottom of the hole on top of the film, placing supports;
- prepare concrete in proportions of 1 part of cement / 3 parts of sand / 7 parts of medium or fine crushed stone and put it in the formwork;
- after setting, cover the board with foil and wait 28 days until it hardens completely.

Before making a brazier, the surface of the foundation must be covered with 2 layers of roofing material, ensuring the waterproofing of the structure.

The simplest brick barbecues for summer cottages are built in compliance with the usual rules for laying stones with dressing and alignment in level and plumb line. Here it is important to prepare a good solution of sifted sand and clay so that no pebbles come into it. The thickness of the masonry joint on clay mortar is maintained within 5 mm, on cement - up to 10 mm.
Advice. The lower support parts of the barbecue can be laid on a cement-sand mortar with a small addition of clay for plasticity.
Stricter rules apply if you need to build a brick brazier in the form of a yard oven complex:
- each brick is soaked for 2-3 minutes in a bucket of water;
- fireclay and ordinary masonry are not tied together;
- the bricks are adjusted and trimmed as a result of fitting. For this, the row must first be laid out without mortar;
- the horizontal and vertical lines of the structure are checked after each row of stones has been laid.
Advice. If you want to build a brazier made of bricks with a decorative slit seam, you must not reach the front of the stone with the mortar during laying.
In order to better understand the sequence of actions, as an example, it is proposed step-by-step instruction for laying a brick barbecue grill with cabinets for kitchen utensils. The previous section shows its orders (Option 3), which must be followed. So, the order of execution of the masonry is as follows:
- from the 1st row to the 8th, the walls of the lockers and the wood niche are being erected;
- 9th row: using templates, the arches of red brick lockers are laid out, steel corners are placed above the firebox;
- 10th row: the overlap of the wood niche is formed from refractory stones, cut to 18 cm and placed on the edge;
- 11th and 12th rows: all niches overlap, while around the entire perimeter the bricks are released outward by a quarter;
- on the 15th row, a firebox made of fireclay bricks is laid out. A circle is cut out and installed to form a vault;
- on the 20th row, external walls and a firebox are being erected. An arched vault is laid out from chamotte stones, cut "under a wedge";
- from the 20th to the 24th row, the bricks are trimmed so as to gradually move to the section of the chimney;
- all stones of the 24th row are released outward by a quarter, then the chimney is erected.
As a result, we get such a nice structure:

Conclusion
If you choose barbecues for a summer residence or a house of a simple design, then their construction will not be difficult. As for outdoor stoves, you will have to spend time and effort here, but the result looks much better and more practical.
Exists different variants designs of barbecues, most you can purchase in a store or order from the masters. If the budget is limited, many structures are built independently. A good example is a do-it-yourself brick grill. Drawings and photos, step by step instructions and detailed description are given in the article. Its design fits perfectly into landscape design any suburban area... Within the framework of the article, we will describe this process in detail, “from A to Z”.
How to make a brazier out of bricks with your own hands? Look for step-by-step instructions, drawings and photos below!
Brick barbecue device or what may be included in it
A brick barbecue device can be of a simple type or more complex. Device simple barbecue:
- several rows of bricks;
- brazier.
More complex structures are presented either as one massive building, or as a whole complex of buildings. They all have a similar structure and layout:
- foundation;
- base;
- lower side walls;
- brazier;
- upper side walls;
- chimney.
As outbuildings can act:
- smokehouse;
- bake;
- tandoor;
- washing;
- cauldron;
- countertops for food preparation;
- niches for storing dishes.

Methods for determining the quality of bricks
Each type of brick has certain characteristic features... You can learn about them from the marking, which is presented in the form of letters and numbers on the product. The properties of the material meet the requirements of regulatory documents and determine its scope. This is especially important when building a brick brazier with your own hands. Drawings and photos, step-by-step instructions and ordering are presented in the corresponding section of the article.
It is necessary to be able to independently determine the quality of the building material. There are a few simple ways to help with this. In addition, in this way it is easy to check the integrity of the manufacturer.
When choosing a brick, you need to look at:
- appearance ... The shape must be correct and free of any significant damage. The permissible deviations from the norm are within two millimeters for one of the sides;
- vibration and sound... Try hitting the brick wall lightly with a hammer. If it is of high quality and there are no internal cracks in it, the hammer will bounce off and ringing will appear;
- internal structure... There should be no chips on the product, and the color of the section is encouraged to be uniform. Chamotte should not crumble from bricks.

These measures will help you decide which brick is needed for the barbecue in your case. Remember: quality materials are the key to a strong and durable construction. Only in this way will she be able to withstand the impact high temperatures and will serve you long years.
A brick that emits a dull sound when struck with a hammer indicates the use of low-quality raw materials in its manufacture and a violation of production technology.
Refractory brick characteristics
The question of which brick to use for the barbecue worries those who decided to build a structure with their own hands and want to choose best material for construction. Since the material will be used at high temperatures, it must meet important technical requirements:
- heat resistance. The brick must be rated for use in temperatures over 900 degrees. Such a temperature should not lead to its destruction even with prolonged exposure;
- the lower the thermal conductivity, the better. So you will reliably protect the buildings that are nearby;
- high mechanical strength.
The optimal characteristics of bricks for barbecue are:
Requirements in accordance with GOST
The brick that is used for laying the barbecue must meet certain requirements according to state regulations. We are talking about the following indicators: strength, temperature limit, and more.
To assess the quality, use GOST 8691-73... It determines the exact indicators during production:
- sizes;
- weight;
- volume.
Density and fullness
The density and fullness of the material depend on the composition of the raw materials that are used in the manufacture. If it is clay, then the indicator should be in the region of 1800-2000 kg / m3, if quartz sand - 1800-1950 kg / m3.

Also, an important role is played by the extent to which the manufacturing technology is followed. When building barbecues, it is necessary to use solid brick, since it has a good indicator of strength. This type is resistant to various factors of influence (unfavorable weather conditions, high temperatures).
Strength
For each brand of product, the strength value is different. It depends on whether the recipe and technology for making bricks, as well as GOSTs, are followed.
Fireclay bricks have the best strength indicator. It is equal to 22 N / mm 2. Such products are perfect for the construction of fireboxes, barbecues and stoves. Strength is the defining parameter when choosing a material.
Temperature limit
This indicator depends on the material and technology by which the brick is made.
For chamotte, this indicator is in a wide range of 1640-1740 degrees. Such material is suitable for arranging a brazier.
Ordinary ceramic bricks can easily withstand lower temperature levels - up to 1200 degrees Celsius. Therefore, we recommend using it for laying the lower levels of the barbecue, external walls, as well as the smoke box.

Other sections of the structure can be made of bricks with less stringent requirements.
Thermal conductivity
The thermal conductivity index is responsible for the ability of the material to give off heat. Since the barbecue is located near other buildings, it is important to provide them with reliable protection. This can only be achieved by using bricks with low thermal conductivity.
There is a certain coefficient called the coefficient of thermal conductivity. The lower it is, the more refractory the brick is.
For ceramic, this figure is up to 0.8 units, and for chamotte - up to 0.6.
Resistance to aggressive substances
When burning wood, coal and other raw materials, products are formed that negatively affect the brick. The most common substances that have a negative effect on bricks include:
- acids;
- alkalis;
- salt.
Under their influence, the material is destroyed over time. To prevent this, it is necessary to choose brands that are resistant to aggressive substances. We recommend using fireclay bricks.
Silicate, hollow and quartz bricks are unlikely to be suitable for use in such conditions due to their composition. In an acidic environment, they begin to break down.
Water absorption
The main feature of fire-resistant bricks is that they have voids inside. This is due to the raw materials from which it is produced and the production technology itself. As a result, such products are capable of absorbing water, both from the atmosphere and in direct contact with it. Blocks can accumulate up to 25% of liquid. Depending on the quality, this indicator may vary.
The higher the water absorption of a brick, the less it is resistant to frost: if, for example, a product has this indicator at the level of 10%, then, as a rule, its frost resistance is very low.

Silicate bricks have a water absorption coefficient of up to 15%. Builders do not recommend building foundations and plinths from it, as it will quickly lose its strength and break.
The optimal indicator of water absorption for bricks is 8%
Frost resistance
This indicator characterizes the ability of a material to withstand low and high exposure temperatures, provided that a large amount of moisture is absorbed as much as possible. To calculate the indicator in production, the brick is subjected to freezing and thawing in a special way, and then it is measured whether there have been any significant changes in its structure.
The number of freezing cycles is an indicator of frost resistance. The optimal value for this indicator varies from region to region. For example, in warm regions of Russia, the norm is 15-20 F, and in areas with a more severe climate - 35-50 F.
The frost resistance index is regulated by several GOSTs:
- GOST 530-2012;
- GOST 379-95.
Dimension and accuracy of geometric shapes

This indicator is one of the most important for any brick, since the quality and size compliance directly depends on whether the final masonry will turn out to be even. Refractory is no exception. Its dimensions are governed by the rules of GOST 8691-73.
According to the requirements, the product must have 11 standard sizes. In this case, the length, thickness and height are in a certain ratio to each other (standard brick: 250x120x65). As for deviations, they should not deviate from the norm by 5, 5 and 2 mm, respectively.
The control of this parameter is carried out directly at the enterprises that manufacture bricks. Several products are selectively taken from a batch and their compliance with the standard is assessed.
Choosing a brick manufacturer
Domestic and foreign factories are engaged in the manufacture of bricks. They offer big choice goods that differ in their characteristics and can be used in the construction of barbecues. We offer three manufacturers for consideration: the Vitebsk brick plant (we will use it in the construction of the barbecue), the Borovichi plant and LODE.
| The name of the company | Characteristic features of bricks |
|---|---|
|
|
|
|
| LODE
|
|


There are several factors to consider when choosing a brick. The main ones are the requirements of standards and the cost of masonry. The operational properties of the barbecue depend on how correctly the brick is chosen. V this issue recommend not to save money and give preference to high-quality material
Advantages and disadvantages of a brick barbecue
Before assembling a brick brazier, you need to dig deeper into the topic and understand the types of materials from which braziers are made.
The most popular materials for the assembly of barbecues are:
- heat-resistant steel (for example, grade 09G2S);
- cast iron;
- brick;
- concrete blocks;
Craftsmen make them from materials at hand:
- gas cylinder;
- ordinary large natural stone;
- metal barrel.
Among purchased braziers are widespread:
- folding;
- electrical.
These types of barbecues differ from each other primarily in price, size, and weight. If you still can't decide which option is best for you, we suggest you check out the comparison table below.
| Brazier type | Advantages | disadvantages |
|---|---|---|
|
|
|
 |
||
|
|
|
 |
||
|
|
|
 |
||
| Folding brazier |
|
|
 |
||
|
|
|
 |
||
| Electric barbecues |
|
|
 |
||
Which brick is better for building a barbecue
Modern market building materials offers customers a large selection of bricks of different shapes, sizes and colors. They are produced by different factories and differ from each other in a number of key parameters. Below, we will try to figure out which brick for the barbecue is best suited. More details in the table:
| Picture | Brick name | Dimensions, mm | Porosity,% | Density, kg / m3 | Thermal conductivity coefficient, W / m * K | Colors |
|---|---|---|---|---|---|---|
| 250 x 120 x 65 | 8% | 1800-1950 kg / m3 | 0,7-0,8 | White gray | ||
 | 250 x 120 x 88 | 6-8% | 1515 kg / m3 | 0,66 | White gray | |
 | 250 x 120 x 88 | 6-8% | 1000-1450 kg / cm3 | 0,4 | Gray | |
 | 250 x 120 x 65 250 x 120 x 88 | 8% | 2000 kg / m3 | 0,5-0,8 | red, brown, yellow, light brown | |
 | 250 x 120 x 88 | 6-8% | 1100-1400 kg / m3 | 0,57 | dark brown | |
 | 250 x 120 x 65 250 x 120 x 138 | 6-8% | 1600 kg / m3 | 0,34-0,43 | dark brown | |
 | 250 x 120 x 140 250 x 250 x 188 380 x 250 x 219 510 x 250 x 219 | up to 14% | 790-960 kg / m3 | 0,22 | brown, dark brown, yellow | |
 | 380 x 250 x 219 | up to 14% | 700-1200 kg / m3 | 0,11 | brown, dark brown, yellow, red | |
 | 240 x 115 x 52 240 x 115 x 65 240 x 115 x 71 210 to 100 to 65 240 x 115 x 113 | until 6% | 1900-2100 kg / m3 | 0,8-0,9 | brown, red, yellow | |
 | 250 x 124 x 65 | 3-8% | 1700-1900 kg / m3 | 0,6 | brown, red, yellow, beige |
Special requirements are imposed on the material that is used in the construction of a brick barbecue with your own hands, since the integrity and service life of the future structure depends on it.
The best option is fire resistant bricks. It allows you to get a safe, durable and reliable design. You can build a brazier from the following types of bricks:
- from red;
- from fireclay;
- from white;
- from facing;
- from ceramic;
- from silicate.
We build a brazier out of bricks with our own hands: step-by-step instructions, drawings and photos
Despite the fact that building a brazier out of bricks with your own hands is not difficult task, it has a fairly large number of stages. Each of them has its own small construction features, which together lead to a large positive result. Therefore, it is important to draw up a plan for how you will build the future structure and adhere to it clearly. The object of this master class is in the photo below.

- Conduct preparatory work... Analyze the topic, find out in more detail the features of barbecues and more about their designs.
- Determine a place for the structure on your site and prepare it.
- Make a project diagram.
- Buy all necessary tools and materials - everything that will be useful to you in the work on the project.
- Decide on the order. As part of this step, you will prepare a plan for how to properly lay the bricks for your barbecue.
- Lay the foundation of.
- Prepare mortars for masonry.
- Put the grill on dry.
- Put the grill on the solution.
- Build a canopy.
Preparatory work
Let's start with preparation. Take enough time to dive into the topic and find out all the details of the project. See examples of popular garden barbecues, their features, pros and cons. This will save you from wrong actions in the future. As a result, you will know exactly how to build a brick brazier. After that, you can proceed to the stage of selecting a place on the site.
We determine the place for installation on the site

The choice of a place for the construction of a brick barbecue with your own hands, drawings and photos, as well as the step-by-step instructions of which are located below, should be carried out taking into account its safe and convenient operation. It is not necessary to place the structure:
- Near a house or other buildings. The minimum distance from structures is three meters.
- Under the hanging branches of the trees.
- End-to-end with a support in the form of a fence, the walls of the house.
- Near objects that are flammable.
Such restrictions are not defined by chance. During cooking, the structure heats up, there is a possibility that sparks from coals and other raw materials will fly. When choosing a place, you must be guided by the fire safety requirements.
You can draw a plan of your site to make it easier to imagine where to locate the barbecue complex.

- Availability groundwater... It is better to choose a place where they are not;
- Direction of the wind. It should not lead to ventilation and smoke problems;
Before building a homemade brick brazier on the site, let's figure out its project and draw the dimensions - more on that later.
Project, drawing and diagram on paper
It is not easy to prepare a project and drawings of a brick barbecue with your own hands with dimensions. This work requires certain knowledge and skills.
This stage involves determining the dimensions of the future structure. They will be used in drawing up the project plan. On the drawing you need:
- draw all structural elements;
- designate dimensions;
- specify the exact location of the elements.
In this case, it is important to observe the accuracy of proportions. Thus, it will be possible to visually assess the appearance and ergonomics of the future structure. We offer a plan and drawing below. The only blot - this plan shows a brazier with countertops instead of a stove, but otherwise its design is similar. You can see how the stove looks like in the photo below.
 , as well as the explanation and description below
 Detailed drawing designs are presented below.

- The total width of the structure of 8 bricks is 2000 mm;
- Length of 3 bricks (not shown in the drawing) - 750 mm;
- The height of the slab of 12 bricks is 780 mm;
- Internal height of the combustion chamber with 12 bricks - 780 mm;
- The total height with a smoke chamber of 43 bricks is 2795 mm;
Tools and materials
When the brick barbecue scheme is ready, you can take care of the tools that will be required to complete the plan. You will need:
Instruments:


Gloves
Rope and pegs
Cement container
Bulgarian
Materials (edit):


Ordinary brick 180 pcs
Brick Ш-8 - 175 pcs.
Brick Ш47 for the arch - 26 pieces

Fireclay sand

Corner
Cleaning door 140x140

Furnace door 410x410

Cast iron tiles
How many bricks do you need for a barbecue? For this project, you will need - 831 pcs, as indicated in more detail above. In addition, we need cement, sand, clay, fittings, metal corners, tiles, etc. Only if you have all the materials can you start the main work.
Mounting
It's time to start directly building a brazier with your own hands. When doing the work, it is important to consider each brick row. More details about this will be described below in the paragraph on the order, but for now we suggest that you familiarize yourself with the types of solutions that are useful for work.
Masonry mortar
When building a barbecue in the open air, 3 types of solution are used. This is due to the different heating temperatures different parts constructions.

| Solution type | Application | Description |
|---|---|---|
| Cement-sand | The outer verst of the masonry is the foundation, the first rows of the barbecue (up to fireclay bricks), the head and neck of the chimney. | Cement-based mortar is used in places where there is no strong heat. It is not suitable for laying the inside of the oven. |
| Clay-sandy | Internal masonry masonry, namely, the thermal storage zone, the source and fluff of the chimney. | More heat-resistant (up to 400 degrees) than the cement analogue, and also environmentally friendly. The shelf life of the solution is not limited! In case of moisture evaporation, it is treated with water dilution. |
| We use it for laying the combustion chamber. | When buying fireclay clay, make sure that it is not spoiled and has not been in a damp room for a long time. During operation, such clay can withstand up to 1800 degrees Celsius. A solution based on it is plastic, but extremely durable when dried. |
In the manufacture of fireclay mortar for a barbecue made of bricks, areas with increased heat load will need:
- fireclay sand;
- ordinary clay;
- water.
To do refractory mortar, follow these steps.
- First, take clay (a full ten-liter bucket), add water to it and stir until a homogeneous gruel. Leave it on for 3 days until it swells.
- Then take more water and add it to the solution. Stir in the sand gradually. The resulting mass should be like thick sour cream in consistency, for example. The optimum sand: clay ratio is 2: 1.
- In case of overflowing water, add a little more clay to the solution.

Clay-sand mortar
Let's make, we need:
- gray or white clay;
- shovel;
- sand;
- water.
- It is necessary to soak chamotte and ordinary clay 1: 1. After the latter swells, mix with a spatula so that there are no lumps.
- Add sand in a ratio of 4: 2 with clay and water. We do not use cement in such a solution.
- The last point is to check the readiness of the solution. We take two bricks and put them on top of each other with a 5 mm mortar joint, removing its excess. We let it dry for 40 minutes and check the quality of the hitch - we lift the structure by the upper brick so that the lower one remains in weight. If it does not come off, the solution is of high quality. This concept is called adhesion.

Cement mortar
We are preparing a cement mortar, for its manufacture we will use:
- cement grade M400;
- water;
- sand;
- mixing container.
Manufacturing technology cement mortar for a brick barbecue not so complicated:
- We use the proportions of cement: sand = 1: 3.
- The sand should be free of any impurities, as the process of weathering the solution from the masonry will accelerate. The yellower the sand, the less quality it is.
- We use a container - 1 bucket of cement, 4 buckets of sand. We get 40 liters of the mixture, because cement still fills the distance between the sand.
- Add water at room temperature at the rate of 0.75 liters per 1 kg of cement, stirring the solution.
- Check for adhesion in the same way as in the previous point.

On average, for laying 100 pieces of bricks with a 5 mm seam, you will need about 30 liters of mortar.
Since this structure has a lot of weight, it is impossible to do without a strong foundation for a brick brazier.

- Laying out the foundation and marking the place. With the help of a tape measure, the place where the structure will be located is measured. Next, a shovel, pegs and rope are used;

- Digging a pit. Its depth should be 30-35 cm for a monolithic slab. This is quite enough (but it all depends on the soil in your area). Length - 2200 mm, width - 950 mm.

- We fill up a layer of sand by 10 cm and make a sand pillow, pouring water on the ram. Next, we lay a mixture of crushed stone and sand 3: 1, also by 10 cm.
- Around the base, you can make a horizontal waterproofing layer, into which we pour clay and carefully ram it.
- We lay the lining roofing material of the RKP-350 (400) brand for vertical coating waterproofing. It is quite durable and available material... This stage is mandatory if the groundwater level in your area is at a depth of more than 1 meter from the bottom of the barbecue foundation.

- Formwork from planed timber (or any durable substitute) around the perimeter of the pit. It should rise about 8 cm above the ground. It is reinforced with supports at two edges and in the middle of the structure in order to prevent destruction during the pouring of concrete. The formwork is needed so that the monolithic slab is flat.
Machine the boards with oil before laying to make them easier to remove.
- We lay the reinforcement (8mm) at equal intervals of 10 cm in length and width (reinforcement). We knit the reinforcement with wire and prime it with cement milk of the consistency of the dough. It is installed on supports so that when pouring it is approximately in the middle of the slab.

- We use cement grade M400. A solution in this proportion is cement: sand: gravel = 1: 2: 4. We dilute with water to a state of thick gruel.
- Fill in one go to get a monolithic slab without cracks from the inside.

- The surface must be leveled with a spatula.
- The first 3 days we cover the plate with plastic wrap in order to protect it from drying out.
- After 6-8 days, the formwork can be removed.

After the foundation for a brick grill is ready, you need to leave it for a while. 3 weeks will be quite enough (however, it all depends on the thickness of the structure). During this period, he will sit down and gain the necessary strength, so that brickwork can be started.
Do-it-yourself brick grill ordering
DIY brick mangala allows you to:
- Calculate the number of bricks required for construction (831 pcs);
- Calculate the required amount of masonry mortar (~ 250 liters);
 Ordering a brick barbecue (masonry drawings)
 The order is shown up to 24 rows(smoke chamber). The scheme of its masonry can be viewed on the sections, and the drawing in the corresponding section of the article.
Now let's take a closer look at each of the rows. For convenience, we introduce legend of bricks:
- Vitebsky - “B”;
- Private - "R";
- Brick Ш-8 - "Ш-8";
- Brick Ш-47 - "Ш-47".
| Row | Brick |
|---|
Country rest on Sundays in in most cases is associated with cooking very tasty meat, fish and vegetable dishes on hot coals. Of course, you can always whip up a small brazier, even simply digging a depression in the ground and coming up with some crossbars for a net or skewers. But, you must admit, it is still much better and tastier, with less fuel consumption, the products will be prepared, in the case of using special designs - barbecue, grill or barbecue.
Owners of suburban areas in general, probably a sin not to have at their disposal such devices, stationary or portable. The stores offer a fairly wide selection of such devices welded from metal. However, if the owner of the site has at least the initial skills in carrying out construction work or in the processing and welding of metal, it probably will not present a particularly big problem for him to build a barbecue with his own hands, of varying degrees of difficulty.
What is hiding under the word "barbecue"?
First of all, you need to figure out what we should get if the goal is to create exactly a barbecue.
The etymology of this name is not entirely unambiguous - there are several versions of its origin. The most plausible seems to be the option that connects him withancient greek, and then the Latin word "barbarus", which meant an alien, a foreigner, alien to culture. In our language, the word gradually transformed into "barbarian".
Perhaps the way of cooking these very semi-savage nomadic tribes - barbarians - on open fires or in stone cave hearths, formed the basis of the established name. But, you must admit that we all really, really like this "barbaric" method!
Decided to build a barbecue oven?
But before moving on to the barbecue article, be sure to read how to lay bricks -.
In addition, the tandoor is an excellent solution! Read about do it yourself on our portal.
But the question immediately arises - there are many recipes for cooking grilled, grilled or using barbecue culinary technology. What is the difference, what is the subtlety that distinguishes one from the other?
By and large, the difference is small, but still it is.
- An ordinary grill, as a rule, is some kind of metal or brick container for coal (box, box, etc.), on top of which skewers are laid or a grate is installed on which food is laid out. At the same time, the installation height is not regulated in any way - the delivery is always the upper edge of the barbecue itself. From above, the products to be prepared are freely blown through with air, for which no obstacles are created. In the box itself, holes are made for blowing in the air necessary for burning firewood and the subsequent smoldering of coals. In principle, they do not create any additional traction in the barbecue - only the heat transmitted by direct heat radiation is involved in the cooking process, which immediately dissipates above the level of the skewers or the grate.
 The simplest in the "family" is an ordinary grill
 This, as you can see, is the simplest of the listed devices. Cooking meat on it requires a certain skill, since the heat comes only from below, and it is important not to overexpose, not overdry the side of the food facing the fire.
- Grilling also involves cooking on charcoal, but the principle is different here - the closed volume in which the process takes place is important. Meat products can also be skewered or lined on the gridaboveon glowing coals that took the heat, but then the grill must be closed with a lid.

Hot air in a confined space spreads more evenly, and the roasting process occurs simultaneously from all sides. Of course, combustion requires air ducts and smoke outlets¸ which is why grills are often supplemented with a small chimney.
- But the barbecue brazier takes some intermediate position between the usual brazier and the grill, and is closest to the "cave", "barbaric" conditions for cooking meat. It resembles a hearth with one face open.
 For a barbecue, either a fireplace closed on three sides is required ...
 Another option is when there is necessarily a side around the barbecue grill, a wall that does not immediately allow the heat to disperse to the sides of the slightest breeze.
 ... or the grill is surrounded by a side wall that retains the heat at a certain height from the fried food
 The walls of this side or hearth also heat up and participate in the cooking process. It turns out a kind of thermal cushion that envelops the product from the outside and from the edges, and in the case of the hearth type of barbecue - also to some extent from above. It is clear that in such conditions the meat is cooked faster, and there is much less risk than overdrying it on the grill or even burning one of the sides. As a rule, on all barbecues one or another possibility of adjusting the height of the grate above the coals is thought out.
Artificial draft in a barbecue is not created - the slower the hot air moves, the better. In a hearth-type barbecue, of course, you cannot do without organizing smoke removal, but the pipe should not be high - usually from the level of the brazier to the top head - no more than one and a half meters.
To be honest, all these three culinary devices are so "related" to each other that very often they are easily and simply transformed into one another. For example, a grate installed or suspended below the level of the walls of the barbecue immediately transforms it into a barbecue. And if you close the lid on the barbecue or close the door of the hearth, then, accordingly, you can cook according to grill technology.

Perhaps the reader will object to such a gradation of devices for cooking over an open fire and coals, since there are a lot of different opinions on this issue on the Internet. However, later in the article, we will consider those options for the manufacture or construction of a barbecue roaster that fit the criteria described above.
Forester Barbecue Prices
barbecue Forester
Options will be considered in sequence from simple to complex, from temporary to portable braziers, and then to stationary complexes.
The simplest barbecue brazier in ten minutes
This option is available to literally everyone, even people, absolutely not owning construction skills. By itself, the method of erecting such a barbecue brazier is in many ways reminiscent of a children's game of cubes.
For work you will need:
- About a hundred bricks (pos. 1). Their number may be smaller - it all depends on the height of the future "structure".
- Sheet metal (pos. 2) and grille (pos. 3). The size of these elements should be approximately equal. In fact, their length and width will also determine the size of the brazier.
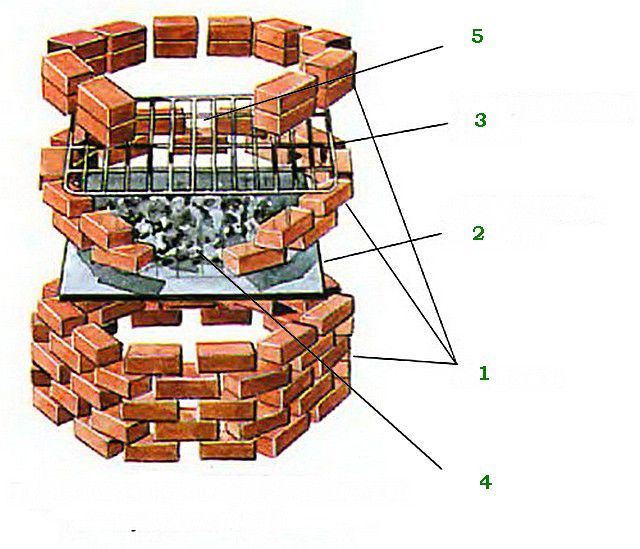
The laying will be carried out "dry", that is, no mortar is needed.
- For the construction, it is necessary to prepare a flat and solid area so that it is fireproof. For example, it is quite possible to lay out the brazier on a compacted soil area, cleared of dry grass.
- On the finished site, a circle is laid out of bricks laid flat, leaving gaps between them of about 50 mm for free air passage from below. It is worth immediately comparing the diameter of the laid out circle with the dimensions of the sheet and the lattice - these metal elements must completely overlap the resulting "well". In the above diagram, 12 bricks are involved in the laying of one row.
- In the same way, four more rows are neatly stacked, each with an offset, so that the masonry is "in a bandage".
- A metal sheet is laid on top of the fifth row. Its thickness should be at least 2 ÷ 3 mm, since it is on it that a fire will be made, wood burns and coals smolder.
- The next two rows of bricks will create a kind of hearth. The masonry principle here remains the same as below, but there is one peculiarity - one brick from the bottom is not reported from the front side and, accordingly, two in the second row (pos. 4). This opening will become a furnace window through which the loading and ignition of firewood, tedding of coal will be carried out.
- The next step is to put a metal grate on the brick "well", on which the fried products will be placed.
- Two more rows of bricks are laid on top of the grating. In this case, no gaps should be left between them - a solid side must form around the brazier in order to implement the "barbecue principle". It is also permissible to leave a small opening in the front part, for the convenience of manipulating with a spatula or tongs while turning the fried products over.
A similar brazier can be left on site at summer period, but if there are fears that bricks and metal parts can simply "take away" in the absence of the owners, then not difficult at all disassemble it to cover the materials in the utility room. If necessary, rebuilding the barbecue will not amount to tons of ore and will not take much time.
Metal barbecue braziers from scrap materials
If the owner of the house has good skills in metal processing and welding, then very good option can become a portable barbecue model. The task will be even more simplified in the case when there are old unnecessary metal drums or gas cylinders.
In principle, you can even do without welding - it is this option that will be discussed. Pictures in the left column of the table can be viewed in more detail by enlarging them with a mouse click.
| Image | Description |
|---|---|
 | Take a regular standard metal barrel in good condition. It is important that no easily flammable products (eg gasoline) are stored in it beforehand. An external marking is immediately made on the barrel - two parallel lines between the bottom and the lid. The area to be cut should be approximately ⅓ of the surface. The figure shows the markings made with two strips of electrical tape (blue arrows). Pay attention to the location of the barrel filler neck - almost at the level of the far line of the marking, with a slight offset back (red arrow). This is important as the neck will then be used for the chimney. |
 | The transverse cutting lines are marked approximately 50 mm from the flanged joints of the cover and bottom, and should go strictly parallel to them. Then with the help of the "grinder" the intended window is cut out. It is very important to make the cuts as smoothly and accurately as possible, since the cut out fragment will be used as a lid, and the gaps when closing it should remain minimal. |
 | Further work will be easier if you immediately build a stand for the future barbecue. There can be a lot of options here, but as an example, we can give a simple structure that does not require welded joints. The diagram is shown in the figure. You will need pipe pieces Ø 40 mm - 4 pieces 750 ÷ 800 mm long (this height will provide the most comfortable use of the braziers), and 2 pieces of length equal to the length of the barrel laid on the horizontal surface with the addition of another 150 mm to the top attachment nodes. The connection of the legs with the crossbars is carried out with bolts, for which holes are drilled in the pipes (shown by the arrow) |
 | Now it is the turn to make the jumpers, which will add rigidity to the stand structure. It will be both cheaper and easier to make them wooden, or more precisely, their plywood with a thickness of at least 10 mm. For this, two strips are cut with a length of 700 mm, and two strips - 900 mm, with a total width of 150 mm. In two of them, the drill-crown selects holes Ø 42 ÷ 45 mm, equidistant from the center and the distance between the marked centers of the holes is 500 mm. The other two holes are the same, but the distance between their centers is increased to 750 mm. This will give the legs a slight inward slope, which will increase the strength of the structure. The first pair of plywood blanks is put on the pipe legs of both metal halves of the frame (blue arrow). For greater rigidity, the lintels are connected to each other using self-tapping screws with a crossbar, also made from a strip of plywood (red arrow). By the way, this jumper can be made wide - then it will also serve as a fairly convenient utility shelf. |
 | Now - how to fix this wooden spreader bar at the desired height? The easiest way is to attach ordinary clamps to each of the legs - they will prevent the plywood parts from dropping down. It is important to place this knot no closer than 400 mm from the top rungs so that wooden parts did not get burned from the heat when using the barbecue. Such fixation with clamps will allow, if necessary, to quickly disassemble the entire structure, simply by loosening the nuts and removing the parts from the legs. The lower jumpers are installed in the same way, in which the holes are slightly wider. The height of their location is 100 ÷ 150 mm from the ground level. It is not required to connect them with a cross member. |
 | That's it, the barbecue stand is ready. You can put the barrel on top and continue working. The barrel of the barrel is firmly seated between the metal crossbars (blue arrow), and the ends rested against the connecting nodes (red arrow), which excludes its movement in any direction. Under the weight of the barrel, the entire structure of the stand, located under a slight slope, will finally wedge inward and will be motionless. |
 | We continue to work on the barrel itself. The main tools are a drill, a screwdriver, wrenches, since all connections will be threaded. It is undesirable to use aluminum rivets, since the thermal resistance of this metal is low. First of all, brackets are installed on which the brazier mesh will be laid out. These are ordinary steel corners, bolted just below the level of the cut-out opening on one side - and horizontally to them - on the opposite. Placement of the corners - depending on the size and rigidity of the existing grille, so that it is securely installed with an emphasis at least in all four corners, and if necessary - with additional corners to avoid bending. |
 | Most often, a collapsible grate of two halves is used - it is easier to install it in the barrel cavity. The figure shows just such an option. Arrows indicate installed brackets. |
 | It's time to tackle the hinged lid. At the rear, high part of the opening, ordinary steel window hinges (non-separable) are fastened to the screws. |
 | The second half of the loops is screwed to the fragment cut earlier from the barrel. It is necessary to very accurately measure the location of the hinges so that the resulting lid fits exactly the size of the window and closes it as tightly as possible in the lower position. |
 | Now the chimney is next (red arrows). The plug in the drain neck is removed, and a threaded sleeve of the corresponding diameter is screwed in instead. so that there is a protruding threaded nipple (item 1). A 90 ° bend (pos. 2) is screwed onto it, to which you can then connect a low pipe, placing it in such a way that the exhaust smoke does not become an obstacle for a person busy with cooking. In the lower part of the end of the barrel, it is additionally fashionable to make an adjustable blower (blue arrows). For this, several holes Ø 10 ÷ 12 mm are drilled (pos. 3), and above on the axle bolt there is a damper, which can be used to regulate the flow of air into the furnace. This is especially important when grilling, because closed lid the brazier may simply stop burning without oxygen. |
 | The last "touches" remain. A chimney is being installed (blue arrow). It is imperative that a handle is provided for opening the lid of the brazier - barbecue. It is advisable to make it from a material that will not get very hot. The options can be different, for example, as shown in the figure (orange arrow). If you wish, after preliminary cleaning, you can cover the top of the barrel with a special heat-resistant paint. The master who made the barbecue about which the story was about, additionally fixed a thermometer (red arrow) on the surface of the lid, allowing you to monitor temperature regime during grill cooking. In fact, the assembly of the barbecue is complete. |
Similar or to a certain extent modified, at the request and imagination of the master, barbecues can be made from their old gas cylinders... (At the same time, care must be taken when cutting the container for the first time, as there may be an explosive residual gas concentration inside. It is recommended to rinse the cylinder several times with water, and the first cut should be carried out also in a state filled with water).

A creative approach makes it possible to significantly expand the functionality of the manufactured structure. For example, it is easy to provide an additional "option" for the smokehouse by installing an additional chamber at the exit of the smoke from the main brazier. Another option is to install a separate combustion chamber at the bottom, which will be used precisely in the mode of smoking products. And to maintain the desired temperature and the concentration of smoke required for smoking, an adjustable valve is installed on the chimney. An illustrative example of such a model of a barbecue grill with the ability to switch to smoking mode is in the attached video.
Video: an interesting model of a barbecue grill with a smokehouse
If the structure turns out to be heavy, then it can be equipped, for example, with a uniaxial wheel drive. This will allow you to easily move it around the site or clean it in a shed or garage for a period of no demand.
Stationary brick barbecues
Those owners of country mansions who they love solidity and solidity, they will probably prefer something more monumental, stationary, built of bricks for years. Well, in this matter, there is nothing impossible for the independent construction of a barbecue brazier or even a whole complex or otherwise - a barbecue area.

Choosing the best place for a barbecue complex
First of all, you need to decide on the location. This takes into account a number of rules:
- Very often, brick barbecues are installed next to an existing seating area - a terrace or a gazebo. It is quite possible to unite these buildings under one roof, naturally, taking into account the fire safety requirements.
- You should not locate the complex too close to a residential building or even attach to it - this is also dictated by elementary safety rules. It is strictly forbidden to place near garages or utility rooms where the fuel supply may be located.
- For reasons of hygiene and comfort, the barbecue oven should not be planned in the immediate vicinity of any useful places or cesspools, yours or neighbors.
- If possible, it is worth giving preference to a place located on the leeward side of a residential building (taking into account the prevalence of winds in this area).
- Avoid tall shrubs and trees that might be above the barbecue. This is, firstly, unsafe, and secondly, the plants can wither and die from high temperatures.
- If the construction of a barbecue is planned in a previously built gazebo, then it should be provided that the stove is placed so that the chimney does not fall on the roof rafters - it should be approximately in the center between them.

- A good owner will definitely provide for the laying of paths to the barbecue area so that it can be easily approached, for example, after rain. For the same reasons, it is advisable to pave the area near the oven itself.
- It will be very convenient if you lead water to the barbecue area, at least a temporary summer highway. Also, it will never be superfluous to conduct a power line - this will make it possible to organize lighting and connect the necessary household appliances. Of course, both water supply and electricity are optional elements, only at the request and ability of the owners.
- And finally, the barbecue should be positioned and decorated so that this structure fits organically into the overall design concept of the site.
After the location is selected, they proceed to construction. And it always begins with the construction of the foundation.
Foundation for brick oven-barbecue
Barbecue prices GREIVARI
BBQ GREIVARI
Any brick stationary structure always has a considerable mass, which means that it requires a reliable foundation. In the case of building a garden barbecue stove, you can use both a strip and slab, monolithic foundation, but the second is still preferable. One way or another, it is recommended to pave the area around, and it will already be the basis for, for example, laying ceramic tiles... In addition, a monolithic foundation, even at a shallow depth, will be a stable base for the structure being erected.
- A pit is dug under the foundation so that the resulting slab is at least 100 mm wider on either side than the planned perimeter brickwork... On the front side, the ledge can be made larger, so that a small area is formed. The pit depth can be about 400 mm - this will be quite enough.
- The bottom of the pit is covered with a 100 mm sand cushion, which must be compacted with a manual rammer. On top of it, also with compaction, the same layer of gravel or gravel is poured. As a result, the underground poured part of the foundation will be about 250 mm thick.
- A wooden formwork is installed along the perimeter of the pit. It should protrude about 100 mm above the ground surface - this is how the basement part of the slab will be formed. It is advisable to strictly align the formwork horizontally - then the upper edge of the boards will become a beacon for leveling the mortar.
- Reinforcement mesh with cells of 100 × 100 mm is laid. It is better to install it on pads, so that it falls approximately in the middle of the slab to be poured.
- A cement-sand mortar (1: 3) is being prepared, which is poured into the formwork until it is completely filled. The top is leveled by the rule.

Now it remains to wait for the slab to solidify and gain the necessary strength. Recommended first 3 — 4 days regularly moisten the surface and protect it from drying out and cracking, covering it with plastic wrap. The formwork can be removed in a week, but proceed to further construction works gelatinous earlier than after 3 weeks - by this time the concrete should gain about 70% of the strength necessary to withstand the increasing load of brick walls on it.
On the finished foundation, you can build the chosen one. Let's not consider too complex complexes. For a novice builder, one of the models that are quite simple to implement will be enough, which, nevertheless, have good functionality.
An uncomplicated option without a chimney

Any person with the initial skills of a bricklayer should be able to lay such a stationary barbecue brazier. There is nothing complicated - even ordering is not required. The above diagram will be enough, which can be taken as a basis, and if desired, change in terms of the dimensions of the building or its individual elements.

- The size of the width and depth of the building will be determined by the dimensions of the available metal sheet for the brazier (pos. 10). It is advisable that it be made with sides, like a baking sheet, so that the coals do not wake up. Should be the same size match and grid (pos. 9) - there can be several of them, for cooking different products at the same time on several levels.
- Erection starts from the foundation (pos. 1). The diagram shows an already paved slab, but it is clear that the cladding is done after the entire barbecue oven has been erected.
- Construction begins with laying out 5 U-shaped rows of bricks (pos. 2). The remaining space at the bottom (pos. 3) can be used to store some kitchen utensils or a supply of firewood.
- Masonry always starts from the corners of the wall (pos. 6), so that a whole brick lies in these places. The bricks themselves (pos. 7) can be used any fired - the open placement of the furnace does not imply temperatures that are critical for them. The rows are laid out "in a bandage", with an offset of ½ brick.
- The thickness of the joints formed between the bricks (pos. 5) is about 10 mm. As a solution, you can use a heat-resistant masonry mixture, which is purchased in a store. However, the design allows you to do with the usual masonry cement-sand mortar with the addition of clay. Another option is one part each of cement and slaked lime and three parts of sand.
- After laying the first five rows, lay down the sixth row on both sides with a transverse arrangement of bricks (pos. 4). Thus, shelves are created on which the brazier pan will lie.
- Above, the laying continues in ordinary straight rows, to the required height (seven rows are shown in the diagram). On the inner side of the walls, brackets (pos. 8) are attached at several levels, which will become stops for laying the gratings.
The design can be slightly changed. For example, the photo above shows that several levels of the pallet - brazier and grates are provided, respectively, by several rows of transverse laying of bricks. In addition, transversely placed bricks protruding from the outside can support side tables, which are very convenient for preparing and cutting food right next to the barbecue. To do this, it is easy to lay out another brick wall on one or even on both sides.

Such a simple barbecue grill does not imply directional smoke removal. True, if such a structure is supposed to be placed in a gazebo, then a smoke-collecting hood can be hung from above, of the type kitchen hood, and from him already draw a conclusion outside.
Popular BBQ Prices
More challenging task - barbecue with a chimney
The task can be somewhat complicated - to fold the barbecue with the hearth and chimney completely closed on three sides. It is clear that the labor intensity and total costs will be significantly higher here, but on the other hand, the structure itself already looks much more solid and can become a decoration of the site.
There is probably no need to tell a lot here in words - a detailed order of the masonry will bring much more information. It remains only to make some notes to it:

- Experienced stove-makers always recommend, especially for beginners, to precede the laying with a "dry" mortar, that is, each row of bricks is first laid out without mortar. This helps to accurately determine the configuration of the row and fit those bricks that require cutting.
- Since there is already a closed hearth in the structure, its layout (inner lining) involves the use of fireclay fire-resistant bricks. In the diagram, it is shown in a lighter shade.
- In the basement part, you can use ordinary masonry mortar. Starting from the level of overlap under the hearth and above, where there will be an area of high temperatures, a heat-resistant masonry compound is used.
- Laying begins with the first fully continuous row. Of course, there is a constant check for horizontalness using the building level.
- On top of the fifth row, metal corners are laid - lintels along which the masonry will be carried out at the beginning of the sixth, and then the seventh continuous rows. The two compartments located under the hearth can be used to warm up or keep ready-made meals hot.
 Continuation of the scheme - ordering from the tenth row to the very top of the pipe
 - On top of the eleventh row, lintel strips are again laid, and on top of them there are two continuous rows, which will become the bottom of the focal chamber.
- From 14 to 21 rows - a hearth, the walls of which are immediately lined with fireclay bricks from the inside. If it is assumed that the fire will be lit not on a removable metal pallet, but directly on the surface of the hearth, then its base should also be faced with fireclay bricks.
- After laying out 21 rows, a jumper is installed along which the front overlap of the hearth will be laid.
- In the future, the laying proceeds strictly according to the scheme, with a gradual narrowing towards the center - this is how the pyramidal part of the chimney is formed.
- The stepped rise of the pipe can subsequently be lined with a casing made of thin sheet metal so that rainwater or snow does not accumulate and stagnate on the ledges. The pipe is completed with a rainproof metal cap.
- On the side walls of the hearth, metal brackets can be fixed at several levels for the location of the barbecue grills.
As you can see, in this case there is nothing critically complicated: the main thing is consistency, utmost accuracy and accurate calculation when laying each row, with the obligatory control of the horizontal and vertical walls of the walls.
Again, this structure can be basic, near which it will not be difficult to attach cutting tables.

Well, those who still want to build a more complex complex on their own, with wide functionality, with a stove, oven or cauldron for cooking pilaf, are invited to familiarize themselves with the detailed video instructions. This will help you to briskly assess your funds and building opportunities to accept correct solution by choosing an acceptable model.
Video: instructions for building a brick barbecue complex
A modern dacha without a barbecue is a rarity. Doubt? And in vain! Brazier is a very popular thing among nature lovers. This popularity is primarily due to the ability to cook a wide variety of meat, vegetarian and fish dishes over an open fire and, secondly, to its ease of use. Although you should not discount the fact that with the same principle of operation, barbecue grills can have a variety of shapes, structural features, design and sizes, they can be stationary and mobile, collapsible and monolithic, metal, brick or made from a combination of materials. No less attractive is the fact that everyone, even without building skills, can easily build a beautiful stationary brick brazier on their site with their own hands.
Which grill is better?
It is impossible to answer this question unequivocally. It all depends on the needs and personal preferences of everyone. The choice is huge, and the braziers have a lot of differences:
By design:
- collapsible;
- stationary;
- mobile or portable;
- lightweight;
- with barbecue;
- with grill;
- with a smokehouse;
- disposable.
By material:
- metal;
- brick;
- stone;
- combined.
By location:
- in an open area;
- in the gazebo;
- under a canopy;
- in the living area.
By installation method:
- on a strip or slab concrete foundation;
- without additional reinforcement of the base, that is, on the ground.
Metal constructions
A metal brazier is most often used as a portable option when there is no suburban area and you have to go on vacation to the forest or to a reservoir. It can be purchased ready-made or made by yourself.
The most simple construction brazier includes:
- a box without a top cover, in the walls and bottom of which holes are pre-made to improve traction;
- legs made of metal corners and welded to the box.
Photogallery of forged barbecues
Forged brazier with skewers  Portable forged brazier
  Wrought iron grill
  Forged brazier with an openwork back wall
  Forged brazier with a visor
If you have the skills of forging, you can make a very interesting and original brazier.
Photo of small barbecue grills
 Barbecue from a barrel
  Barbecue from a barrel with a lid
  Brazier from a barrel with a smokehouse
Original self-made constructions
 Round barbecue
  Brazier stylized as a chest
  Mangal rook
  Brazier stylized as a ship
And with a little imagination, you can get a completely unusual thing.
The advantages of metal barbecue makers include:
- ease of manufacture;
- mobility;
- availability of material.
- susceptibility to corrosive processes;
- there is a high risk of injury when touching sharp corners and burns when touching metal surfaces;
- insufficient structural stability;
- thin-walled braziers have a short service life and burn out very quickly. They can only be used for laying ready-made coals; it is not recommended to make a fire in them.
Brick kebab makers
Brick braziers are always stationary structures, regardless of size, appearance and the presence or absence of additional elements (grill, smokehouse, etc.). For their manufacture, refractory fireclay bricks are used. Chamotte blocks have a yellowish-sandy color and a noticeable granular structure, they are distinguished by high strength, fire resistance and resistance to chemical influences, for example, soot and ash.
Considering that fireclay blocks are practically not amenable to cutting, manufacturers produce them in different designs (size, configuration), which allows you to choose a shape for the construction of a structure of any complexity.
Advantages:
- durability;
- strength;
- high heat capacity;
- fire resistance.
Disadvantages:
- high price;
- quite often blocks, even from the same batch, are of unequal size.
Important: fireclay blocks with a lighter color than prescribed by GOST are a material in the manufacture of which the technological process was disrupted. Most likely, during firing, it was underexposed in the furnace for the allotted time, and this is fraught with a significant decrease in strength characteristics.
Preparation for construction
Determining the location
Coming up with the design and appearance of the barbecue, you need to try to fit it into the existing landscape design as organically as possible - so that it does not get out of the general style, but complements and decorates the site. In addition to the aesthetic side of the issue, it is very important to follow the recommendations below:
- the minimum allowed distance from open fire to trees and structures is 5 m, and from the side protected by walls - 0.5 m;
- the area in front of an open fire must be covered with refractory material: sand, concrete slab, stone, paving stones;
- be sure to pay attention to which direction in your area the winds most often blow: you should not choose a place for such a structure if there is a risk of smoke entering the windows of a residential building;
- do not place the building too close to adjacent areas, otherwise conflict with neighbors cannot be avoided;
- provide a free and convenient approach to the place where barbecue is prepared;
- take care of the water supply to the fire-hazardous structure;
- make sure that there are no sanitary facilities, compost heaps, garbage containers near the food preparation area.
Tip: if possible, place a corner for spending your leisure time behind the house, away from rural streets and neighboring fences - where no one will interfere with anyone. With this approach, in addition to observing the basic fire safety rules, the likelihood of unpleasant conflict situations will be excluded.
Schemes, drawings and project calculations
In order for the brazier to serve for many years without problems and complaints, before proceeding with the construction and purchase of materials, it is necessary to calculate everything, draw a diagram of the structure and draw up an estimate.
At the preparatory stage, a detailed drawing should be made with the exact configuration of the barbecue and the appearance of the entire complex.
Then draw a diagram in which to take into account:
- the appearance of the structure;
- the location of the main and additional elements (brazier, combustion chamber, doors, pipe, chimney, etc.).
- all sizes.
How to calculate the size of the barbecue?
The choice of size, configuration and components is solely the prerogative of the site owner, and it is rather difficult to give any precise recommendations, but there are still general standards:
- the depth of the brazier is from 12 to 17 cm, this distance is more than enough for placing coals, and the meat will not be located too close to the heat;
- the height from the ground to the brazier is 1 m, with an individual calculation of this parameter, you can use a very simple technique: measure the distance from the elbow to the ground, the resulting figure will be the ideal height;
- width - by standards, it is equal to one meter, if you do more, it is not very convenient to fry a kebab, since you have to constantly move between skewers, and not watch cooking from one place;
- depth (from the front to the back wall) - from 50 cm, this is the minimum. Ideally, it should be equal to the length of the skewer minus the handle and tip on which the entire structure will hold on to the edges of the brazier;
- taking into account the rather large weight of the structure, the foundation is necessarily built capital, its dimensions should be no less than the area of the base of the barbecue.
Tip: when determining the length of the brazier, it is necessary to count the number of skewers used at one time, take into account that the optimal distance between them when frying meat is 7 cm.Example: 5 skewers are most often used, 6 gaps between them, each 7 cm, which means that 6 × 7, resulting in a brazier length of 42 cm.
How to calculate the amount of materials for the foundation?
As already mentioned, the foundation must be made capital, that is, with digging a mini-pit, leveling the bottom, installing a sand cushion, building formwork and mixing concrete mortar.
Formwork
For the device of the formwork, you can use any available material: slate, used boards, wooden boards or metal sheets. When choosing, only 2 parameters are important - integrity and strength: the material must freely withstand the pressure of concrete.
Calculation of the amount of concrete for the foundation
Despite the fact that the strip and slab foundations have different configurations, they still have the same shape - a rectangle. Therefore, to facilitate calculations, you can use the formula V = a × b × c.
Legend:
V - required amount solution;
a and b - width and length of the foundation;
c - depth.
Example: a pit with sides 3 by 3 meters, its depth (excluding the sand cushion) is 40 cm.
Calculation: 3 × 3 × 0.4 = 3.6 m³.
Note: the amount of sand is calculated in the same way.
We buy a brick
Knowing the physical dimensions of fireclay bricks and structures, as well as the method of laying, you can calculate the approximate amount of material.
The dimensions of the kiln (fireclay) brick depend on its brand, below you can familiarize yourself with the standards.
For construction garden stoves most often blocks with dimensions of 65 × 120 × 250 mm are used.
According to the table above, you can find out how many bricks are needed per 1 sq. m masonry.
- If there is a desire to save money, then only those surfaces that are directly exposed to high temperatures can be laid out with heat-resistant chamotte blocks. The rest of the walls are laid out from ordinary bricks, the price of which is significantly lower.
- In order not to suffer with independent calculations, you can use free construction calculators posted on the Internet.
- The calculation is made depending on the method of laying and taking into account the seams plus 6% per battle.
- Before embarking on complex calculations, builders recommend drawing a plan with an order, then it will be very easy to determine the material even visually, without any formulas, addition and multiplication. By the way, in the schemes proposed below it is very clearly visible how many blocks are needed for each row.
Tools and materials for construction
Instruments:
- trowel or trowel;
- tape measure or meter;
- building level;
- container for mixing the solution;
- oven hammer;
- concrete mixer for self-mixing concrete;
- jointing tool;
- plumb line;
- shovel;
- corner;
- Bulgarian.
Materials:
- pegs and twine for marking;
- refractory bricks;
- cement (M200 or 250);
- ASG (sand and gravel mixture);
- geotextile;
- water;
- reinforcement, bar thickness from 10 mm;
- clay;
- door for the firebox.
Step-by-step instructions for building a stationary brick oven with your own hands
Foundation device
On the selected and free from plantings area, mark for the foundation pit. To do this, drive a peg into the soil, measure the estimated length of the foundation from it (+10 cm for the thickness of the formwork boards), use a tape measure to measure the width and drive the peg again, repeat the procedure until the circuit closes. The resulting corners must be checked with a corner, each must be equal to 90 degrees. Pull the string between the pegs.
Remove the sod from the marked area.
Dig a hole (mini-pit) at least 50 cm deep - 15 cm on a sand cushion and 35 cm on a slab. Align and compact the bottom. Make the walls as even as possible, check the vertical with a plumb line or a level gauge.
Pour sand into the pit, layer thickness 15 cm. Spill it with water, level and tamp.
Install the formwork. Cut the reinforcement according to the dimensions of the project. Carry out strapping.
Pour the prepared solution. When self-mixing the solution, observe the proportion of 1 to 3 (cement, ASG), water needs exactly half of the volume of dry components. Example: cement - 20 kg, ASG - 60 kg, only 80 kg, which means that 40 liters of water are needed. Mixing can be done manually or with a mobile concrete mixer.
Tip: when mixing the solution, do not immediately pour all the prepared water into dry ingredients. First fill in 2/3, mix and look at the thickness of the solution: if it is not plastic enough, then add more. The sand in the ASG can be wet, and if water is added in full, the solution will turn out to be liquid.
Tamp and level the solution. Wait for it to completely harden and gain strength - at least 7 days. In the process of hardening, it is recommended to water the slab with ordinary water from time to time, this contributes to the strengthening of the strength characteristics of the foundation and prevents its cracking.
Remove the formwork. Cover the surface with geotextiles for waterproofing.
Grill laying with the simplest design
Design simple barbecue does not provide for the device of complex chimneys and the addition of any elements, by and large it is an ordinary brazier with a small firebox. Everything is very simple and as functional as possible.
Advice: before starting construction, it is advisable to moisten the brick, for this it is not soaked for a long time in a container or poured out of a garden hose, such activities are performed a day before the start of construction.
1st row - base. A brick is laid out on the prepared foundation and fastened with mortar. In this case, each subsequent row should be shifted by half the block, first in one direction, then in the other direction, the same technique is used in the construction of walls. Dimensions: width - 620 mm, length - 750 mm.
2nd row - perimeter walls.
The 3rd and 4th rows are the same as the 2nd, while it is necessary to install the furnace door as it is laid out. Before laying the 5th row, install a cast iron grate.
5th and 6th rows - perimeter walls.
If the appearance of the structure turned out to be not very presentable, then the outer surfaces can be decorated with tiles, stone or other non-combustible material.
Important: ordinary cement-sand mortar is not used when laying stoves and barbecues, only clay-sand, lime or clay-chamotte mixture is used. Otherwise, the solution will crack and the structure will quickly become unusable. To prepare the solution, yellow, white or gray clay is taken, the main criterion for this is its fat content, this indicator should be as high as possible. No desire to mess around with the batch? Ready-made dry clay-sand mixture can be purchased at hardware stores.
If the bricklaying is performed by an unprofessional stove-maker - which is not surprising, the specialty is rather rare - then it is better, to facilitate the process and in order to eliminate possible mistakes during construction, use one of the schemes proposed below. Several ways of ordering are shown here, starting from the base and ending with a chimney and a pipe, so everyone who wants to will definitely choose what suits him, or on the basis of ready-made drawings he will create something of his own, absolutely unique.
Barbecue scheme with three additional compartments, appearance and the first 9 rows of masonry  Barbecue scheme with a wood-burning stove and an oven
- It is recommended to lay the first row of bricks "on dry" along a previously marked contour, this will allow you to accurately calculate the amount of material and minimize the use of pieces.
- Chimney - minimum height 150 cm. To prevent atmospheric precipitation from destroying the chimney over time, it can be covered with a canopy, canopy or roof. The only thing that should be taken into account in this case: the material for creating a shelter must be non-combustible.
- If it is planned to erect a complex structure with arched elements, then a circle is used during construction, bricks are installed on it with a gap of about one centimeter, then the voids are filled with mortar. The kruzhalo is removed no earlier than 2 days after the clay-sand mixture was laid.
- If the grill is planned as a multifunctional structure (barbecue, grill), then the place and method of installing the grill should be thought out in advance.
- A smoke collector, or a smoke umbrella, does not have to be made of brick, you can order a welded metal analogue of a cone-shaped shape and get an originally designed brazier.
It doesn't matter which version of the barbecue you choose - a simple or complex picnic complex with many additional elements, the main thing is that, in fact, this is a real hearth that will gather around it relatives, friends and relatives. Here you will spend leisure time together and become even closer to each other.
Most people buy barbecues from specialized stores, but some who want to make something on their own make them themselves. In this article, we will consider how to make the simplest and most inexpensive brick brazier with your own hands. Photos of the step-by-step process are also included.
What is the difference between a simple brick brazier from more complex structures
In a small brazier of their bricks, everything unnecessary is absent, it is ideally simple. Another important factor is the difference in budget: building a small brazier is cheaper and faster than a multifunctional one.
The main differences are shown in the table:
| Differences | Simple | Complicated |
|---|---|---|
| Dimensions (edit) | on average - 1000x260x625 mm | from 1.87 m in length and 2.47 m in height |
| Functionality | Can be cooked on skewers, wire rack. Also, subject to caution, put the cauldron. | Cooking meat, fish, vegetables, soups, smokehouse, cauldron. |
| Protection from precipitation | Not protected | Have a top lid that allows you to cook in the rain |
| Build speed | from several hours to a couple of days, depending on skills | From a few days to one and a half weeks |
In this article, we will be happy to tell you how to make the simplest and most inexpensive brick brazier with your own hands. A photo of the finished model and step-by-step actions can be found right there.

We determine the place for installation on the site
The first thing to start with is to choose where our simplest grill will be located. Should be considered:
- Place the brick building away from living quarters and plants. This is important from the point of view of fire safety, as well as taking care of trees, because they can wither;
- It is best to put the structure on the leeward part of the site. This item will be especially useful for those who have difficulty starting a fire;
- It is extremely important that a mini brick grill is at a great distance from cesspools or other latrines.

Tools and materials
To make a small brick brazier you will need:
Materials:
- solid brick - 53 pcs.
- cement;
- slaked lime;
- decorative rock;
- water;
- sand.
Instruments:
- Master OK;
- bucket;
- sandpaper;
- container for mixing cement;
The simplest and most inexpensive do-it-yourself brick grill: photo instruction
A small brazier will be only 4 rows high - all that is required to grill a barbecue! We also do without a foundation. The shape of the building will be as in the photo below, but only we will use solid brick, as in the second photo.


Examples of simple barbecues
Before you start building a simple brick brazier with your own hands in your country house, see examples from our gallery. We hope they inspire you for new projects!