Those who first decided to make repairs with their own hands can be confused. Redecoration begins with the preparation of walls and partitions. First of all, it is necessary to close up cracks, potholes, eliminate cavities and other defects. And along the way, figure out how to choose and apply a putty or repair mixture correctly, because the well-being of the finishing directly depends on this.
When pictures and carpets are removed from the walls and the wallpaper is ripped off, a sad spectacle opens up. The plaster (Read also the entry: “”) is full of cracks, dents and holes from the dowels. Meanwhile, the perfect finishing of the walls is possible only if the walls are even and strong. And if technical wallpaper helps to cope with thin hair cracks, then large defects or old dowel holes need to be repaired with putty or repair mixture. To do this, you need a set of tools: a plastic container, spatulas, a trowel (trowel), a small chisel and a medium-sized hammer. You will also need self-adhesive tape to reinforce the wall in the cracked area. In some, as the people say, "severe" cases, and may be required.
If you do not have the necessary tools and materials, they can be purchased at any hardware store or supermarket at very reasonable prices (the total purchase price will not exceed 1200 rubles). To eliminate minor defects, it is better to use a ready-made putty in a tube. Large damages are repaired using dry mixes, from which the putty mass is kneaded on site. First of all, you need to determine the amount of work, and then calculate required amount repair materials. In this case, the alignment of the repaired areas should be taken into account.
We also note that in the course of cosmetic repairs, they often modernize the electrical network of an apartment or country house... In this case, cable channels, or, as they are also called, punches, are punched through the walls. After laying the wires, the cable channels are also filled with putty.
It remains to add that repair work should be carried out in a well-ventilated area (but without drafts), at room temperature and normal humidity.
So, to work on sealing irregularities and wall defects with your own hands, you will need a container, a trowel, a spatula, a hammer, a chisel, a reinforcing tape and a dry putty mixture, and water.
If you decide to eliminate wall defects using plaster of paris (alabaster), then before mixing it, dissolve wood ("fish") adhesives in water in a ratio of 1:12 - this will prolong the life of the putty mass
SELF-PREPARATION OF PUTTY MORTAR
1. The container is filled by one third with water at room temperature.
2. The dry mixture in the proportion indicated on the package is slowly poured into the container (so that there are no lumps).
3. The water must completely cover the mixture. Pause before mixing.
4. Now the solution is mixed with a spatula until a homogeneous pasty mass is obtained. Then you should wait 5-10 minutes and mix the putty again.

FILLING AND SEALING THE HOLES
1. To remove the old plastic dowels from the wall, screw the bolts into the nickname. This is done manually. Then, grabbing the head with pliers or pliers, the bolts, together with the old dowels, are pulled out of the wall or partition.
2. The holes are cleaned of dust using an ordinary vacuum cleaner, on the hose of which a corresponding nozzle is put on. If necessary, the inner surface of the hole is irrigated from a spray bottle and a primer is applied.
3. The holes are filled with ready-to-use filler from a tube. The putty must be squeezed out slowly and carefully so that the hole is completely sealed.
4. When the mass hardens, the rest of the putty is removed from the wall with a spatula. In this case, the tool is carried out along the wall with light pressure several times and in different directions.

ELIMINATION OF SMALL CRACKS IN THE WALLS
1. Thin (hairline) cracks arising from internal stresses in the plaster are quickly repaired by hand. They are filled with grout (for tiled cladding) or putty mass. It is better to use acrylic-based formulations. Due to their increased elasticity and excellent hiding power, such fillers fill small cracks well.
2. Putty filling is treated with a weak solution of detergent and leveled with a finger or a special narrow spatula. Before painting, the repaired sections of the wall must be sanded and primed.
3. If the walls are supposed to be covered with wallpaper, the hairline cracks are additionally reinforced with a special self-adhesive tape. Then the treated area is leveled with putty.
FILLING AND SEALING OF CABLE DUCTS
1. First, using a sponge, slightly moisten the wall section around the open cable channel (shtraba), otherwise dry plaster will take moisture from the putty mass, which will lead to cracking and even lagging of the applied layer. The wiring must be in a corrugated plastic pipe.
2. Place the required amount of the prepared putty on the trowel (trowel) with a small spatula. The use of a trowel simplifies the work with a thick putty composition. Putty is taken on a spatula in small portions and the crack is filled to the full depth.
3. The cable duct is filled with sections. Putty is applied from top to bottom and smoothed in a circular motion... Particular attention is paid to adjoining the installation box for a socket or switch.
4. The filling of the cable duct is carefully sealed. When the entire stem is completely filled, the resulting seam is passed several times with a wide trowel to completely level it with the wall surface.
You can use a sharp kitchen corkscrew or similar construction tool to remove old wood plugs and even plastic dowels.
Do-it-yourself repair of large cracks on the walls
1. Deep cracks require thorough repair. Using a small hammer and a sharp steel chisel, they open (reach the base) and widen the crack. This creates a sufficient adhesion surface for the filler compound.
2. The opened crack is thoroughly cleaned of dust and moistened with a sponge with water or an aqueous primer. This prevents dehydration and further cracking of the putty.
3. The treated crack is filled to the full depth with a putty. The work is done in layers. A portion of the putty mass is applied to a trowel, with which it is transferred to the wall with a spatula. Use a small nelma or spatula to compact and level the seal.
4. On the still fresh seal, fix the reinforcing tape. The material is pressed and slightly sunk into the putty with gentle movements of the trowel. It is important that the tape is slightly bent into the seam.
5. At the final stage, a thin leveling layer of putty is applied with a trowel. In this case, the embedding must be brought to the level of the wall surface (as they say, "to zero"). The vertical is controlled by the building level.

Based on materials from the publication for help in repairing "Home". Author Tatiana Gagarina.
 Ladymisty 30 ml for nail extension, UV gel, polystyrene, building liquid ...
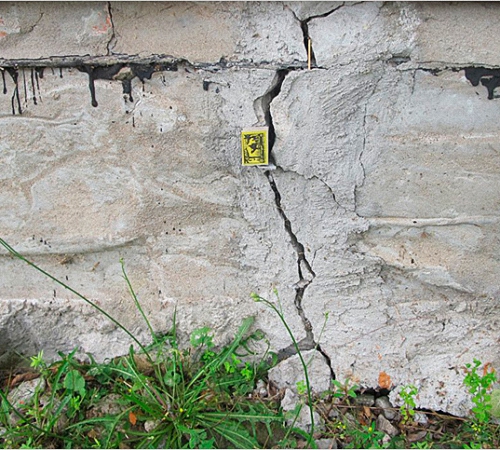
Many residents of the private sector and low-rise brick buildings feel that they will not be affected by the problem of cracks in the wall. However, any structure is aging, makes uneven shrinkage, and redevelopment for many houses is generally destructive. If, next to a panel high-rise building, a foundation pit is made for a new building and work is underway, then cracks in the load-bearing wall appear. Even if there are no noticeable cracks in the house, during the renovation they also show up under the old wallpaper. Therefore, it is important to know how to repair a crack in a wall, no matter whether it is large or small. Even better is to prevent further creeping along the seams in places of noticeable destruction of the vertical outer and inner planes.
Causes of wall cracks
In some regions, cracks in the walls almost never form, in other places they are quite common, especially if the technology of laying a foundation in unstable soils is violated.

The main cause of a crack in the walls of a house is uneven shrinkage or displacement of soil layers under the foundation. This happens for 3 reasons:
- violation of technology by developers;
- unstable and heterogeneous soils;
- insufficient foundation depth required under the given conditions.
Those who have never come across construction technologies have no idea that not every soil is suitable for construction. That is why they often allocate fertile soil outside the city for garden partnerships, but it is forbidden to build two-story and massive houses there. This is due to heterogeneous soils and the specific composition of the soil, which is why it is unacceptable to exceed design load... In some regions, a narrow foundation cannot be laid, in other places piles are needed around the perimeter of the house or a deep monolithic foundation is required.

The construction also takes into account the slope of the terrain or natural creep of the soil, which is not obvious. Only satellite images, which are taken after a few years, often speak about changes in the terrain, but visually this is not noticeable, as in mudflows or landslides. The strength of the foundation is also influenced by movement. groundwater and ground movement at tectonic plate fractures.
Cracks in the foundation, which can lead to the destruction of the entire structure, are sometimes not visible if they are on the inside or outside of the finish. It gradually deteriorates from time to time, especially if the house was whipped up, using the most affordable and low-quality natural materials that are not suitable for capital construction. For example, a foundation solution was poured out of cement of the wrong grade, which is recommended, with unsifted sea sand (instead of river sand), using rubble stone from the nearest quarry. Then you have to independently cope with sealing cracks in the walls.
When a monolithic reinforced foundation is laid at a sufficient depth during the construction of a house, then uneven shrinkage is usually not observed. However, any foundation must stand for a year or two, and only then the walls and roof are built. This is especially true for multi-storey private buildings without an architectural project. The foundation will shrink when the load is exceeded and may crack, which will go along the walls. The most risky is to lay a foundation of unreinforced natural stone that does not have rectangular edges. Violation of the blind area over time will also show the shortcomings of the builders.
If we talk about Russian soil, then it is impossible to immediately briefly tell about all the regions. But a significant part of the flat soils of the central part of Russia is loam and clay soil, subject to the so-called "frost heaving". That is, the groundwater is perfectly absorbed, and freezing, the loam expands. As a result, the new foundation "pushes" the soil out of itself. And when there is an active flood, the clay soil is saturated to the limit with melt water and becomes plastic, like plasticine. It is for this reason that a shallow foundation gives cracks and distortions of the walls.
So, the main reason for cracks in the wall of the house is the displacement of the foundation or its movement, as well as the uneven shrinkage of the structure under increased pressure. Among other reasons, it is also worth pointing out:
- insufficient level of foundation laying;
- heterogeneous soil on the site;
- large slope of the terrain;
- the influence of groundwater and underground rivers;
- destruction of the foundation from time to time;
- the use of low-quality building materials.

Among the most common violations of construction technologies, it is worth mentioning:
- incorrect dressing of the masonry of the internal and load-bearing walls;
- incorrect constructive repair;
- engineering communications are laid after completion of construction through a trench under the foundation;
- lack of waterproofing and storm water;
- wrong choice of the type of foundation;
- digging out an unplanned basement without strengthening the foundations;
- "Sagging" of the fragments of the foundation due to the laying of pipes.

The deformation of the base reaches a critical point, after which the brickwork and the foundation cannot remain intact, this leads to the formation of cracks in the brick walls. When there is no competent architectural project, and construction is carried out "by eye", without careful checking of the horizontal and vertical lines of all surfaces, the structure is skewed. Brick walls (exterior cladding) are sometimes cracked due to improper ligation between bricks and weak mortar.
What to do if cracks are found in the walls?
It should be learned that when the crack widens, the "cosmetic" plastering is not enough, it is necessary to stop the spreading of the walls. Without eliminating the cause, it is impossible to deal with the consequence of a construction error. Sometimes the situation can be somehow saved by "tying" the cracked walls with a metal structure. After that, it is really possible to sheathe the outer surface with siding, foam the walls, and reinforce the inside with a reinforcing stack and plaster.
When the problem is not so obvious, the crack does not expand, then small defects in the walls can be hidden by competent repair. In some cases, the house becomes emergency, and its collapse is a matter of time. Here, plaster and reinforcement cannot solve the issue, and you will have to move out of such a house over time. In addition, water and cold penetrate through the cracks of the emergency house, fungus and mold start up, and the housing becomes unusable. When strengthening the foundation, sometimes the situation can be saved, but this must be done by specialists.
Attention: Cracks in the load-bearing wall are not the problem itself, but an indicator of the destruction that occurs in the building. If an extension or redevelopment of a house was done without effective reinforcement, cracks in the walls are inevitable.

How to repair cracks in the wall?
Found cracks in the wall - what to do? First of all, do not think about the worst, not the fact that the house is in emergency. And if the crack does not grow, then conventional finishing methods are enough to eliminate defects. For example, a gap is foamed on both sides if it is through, and a small crack on the wall or ceiling is plastered under a reinforcing mesh. On top of the puna, waterproofing is needed outside so that moisture does not penetrate into the house. However, any crack is important to fix and clear of unstable particles.
Attention: If a crack appears in the walls of the apartment, you must contact a specialist who is able to determine the cause of the split in the building and assess the degree of resolution. If the house is in disrepair, an act is required.

1. Small cracks in the ceiling or wall.
You can do with cosmetic repairs - plaster the wall again or hide the defect with putty. When clearing the crack from unstable particles, it is necessary to enlarge it a little. But this is better than re-repairing if the loose debris cracks again. Cleaning the problem area is done:
- spatula;
- metal brush;
- vacuum cleaner or thermal blower.
Next, the crack is slightly moistened with a spray bottle and treated with a primer. Be sure to clean the dry surface of the plaster abrasive material, after that they prepare the ceiling or wall for decoration - whitewashing, wallpapering, painting or tiling. After that, small cracks in the plaster of the walls are not visible.
2. Noticeable defects on the ceiling or wall.
How to repair such a crack in the wall? It all depends on what material the walls are from, and the total depth of the crack. Often, a crack is visible only on the inside of load-bearing walls or on the ceiling of a dwelling. In such a situation, the gap is freed from crumbling materials and is sealed with cement mortar or gypsum. After the starting filling and drying of the solution, the finished plaster or putty is applied to the problem area, covered with a reinforcing mesh and again plastering with the finishing mixture. Further, a general leveling of the surface is carried out in order to finally hide the traces of the crack. Further, the surface is closed with a finish - paper wallpaper often tears at the cracks, so it is better to use more plastic non-woven wallpaper for painting.

3. Significant through cracks on the walls.
How to repair a clear through-hole crack in a wall? With obvious defects, it is impossible to do without strengthening the walls in order to prevent further creep. If the building is used as temporary housing, it is sufficient to treat the cracks with foam filler. Keep in mind, however, that too much foam will expand the crack, and the remaining foam should not stick out. Therefore, the polyurethane foam is applied in stages to add in those areas where it is not enough. Further, the remaining foam is cut off, waterproofing is done and covered with cement mortar on the outside and gypsum plaster on the inside. The gap must be reinforced and closed with a finishing putty.
There are often cases when it is necessary to reduce the load on a cracked wall - to dismantle the extension, then install a jumper or metal reinforcement... The corners are pulled together with long bolts, but this is effective on monolithic walls, the brickwork will crack further. On the brick wall the easiest way is to eliminate an external defect, but it is difficult to keep the wall from collapsing.
Attention: The best way prevention of further formation of cracks - strengthening the walls, which is carried out by various methods. It is best to consult a specialist, but sometimes it is not difficult to do it yourself.

Repair of cracked monolithic walls is done with the help of monolithic reinforcing belts along the entire perimeter, after which the exterior walls are finished. A belt of reinforcement is made both at the roof and above the foundation, sometimes in several rows. After that, they move on to repairing cracks in the wall.
Advice: It is imperative to fill the crack to be treated tightly, to the full depth, in layers, actively working with a spatula across the crack. For fresh embedding, it is advisable to lay tape, mesh or other reinforcing material that is slightly trampled into the seam. Upon completion of work, be sure to check the vertical with a plumb line or a universal laser level.
Specialists fill monolithic walls with plastic polymer-cement mortar, which is supplied with a spray bottle. Home craftsman for different types cracks in houses with a typical layout are recommended to use:
- gypsum mixtures;
- starting plaster;
- polyurethane foam;
- self-adhesive tape;
- cement-based adhesive for ceramic tiles;
- mixtures based on PVA glue, sand and M400 cement.

Wall repairs are carried out at room temperature in a ventilated room, without drafts, with normal air humidity.
Tip: Be sure to use a handy work tool and protective clothing. If the ceiling is visibly cracked, beware of collapse!
Important: If the walls of a new country house have cracked even during the construction stage, in no case should you finish building the upper floor or the attic, limiting yourself to light overlap and roofing materials!
Concrete coatings are used in a wide variety of areas: when installing floors, concreting surfaces both in industrial and residential buildings, in the construction of highways and much more. However, concrete has a low tensile strength, therefore, during the hardening process, the mixture shrinks a little and the structures shrink. Because of this, small and more serious defects appear on the surface. In this case, filling of cracks in concrete is required, which is carried out according to different technologies depending on the type of damage and the cause of its occurrence.
Types of cracks in concrete
Some beginners or unscrupulous builders prefer to simply cover up a hole or any other defect with putty or mortar. However, before repairing a hole or crack in concrete wall and other reasons, it is worth understanding what exactly caused the appearance of such troubles.
There are several types of defects:
- Superficial. Such cracks often appear after the foundation is poured in the process of drying out the sand-cement mortar, if the mixture was prepared without observing the required proportions of the components, poor-quality components were used, or there was not enough water in the mixture.
- Shrinkage (also called hairline cracks). Defects of this type are considered the most dangerous, since they cause not only deformation of the fundamental foundation, but of the entire building as a whole. This leads to a decrease in strength. Flaws of this type appear when the load on the foundation is uneven and when the cement composition is incorrectly selected.

- Temperature shrinkage. Slots of this type appear during the hardening of the concrete base due to the exothermic reaction that occurs between cement and water. Very often, when erecting walls and ceilings, novice builders do not take into account the freedom of deformation, as a result of which temperature stress occurs in the concrete mass and defects appear on the surface.
- Cracks and holes that appear due to poor-quality reinforcement. If the frame for strengthening the structure is too weak, then it will bend under loads, which will also lead to the formation of defects. In addition, the reinforcing rods can begin to oxidize. Due to the appearance of corrosion, the material increases in size, tearing apart the concrete mass from the inside.
Outdoor concrete surfaces are also susceptible to cracking. The environment contains chemically active substances that create a fertile soil for the appearance of defects.
In addition, sharp temperature drops, which can occur both on the surface and in the concrete thickness itself, have a destructive effect. At the same time, not only cold air, but also ultraviolet light has a detrimental effect.
It is also worth paying attention to the width of the cracks, since in some cases such defects are not critical.
Acceptable crack sizes
In the construction industry, there is such a definition as the permissible crack opening width, which is determined according to DBN V.2.6-98: 2009 based on the operating conditions:
- The crack size should not exceed 0.5 mm if the concrete surface is not exposed to weather conditions. That is, it is not affected by moisture, low temperatures and ultraviolet light.
- The permissible crack opening width cannot exceed 0.4 mm, provided that the structure is exposed to weather conditions.
- The crack width should not exceed 0.3 mm if the concrete base is in an aggressive environment.
- It is not recommended to allow the formation of gaps of more than 0.2 mm when it comes to reinforced structures characterized by a reduced resistance to corrosion.

Horizontal cracks with a small opening, which often appear in reinforced concrete columns, are also considered harmless.
However, it is important to take into account that there are certain operating conditions under which cracking is not allowed at all:
- when it comes to reinforced concrete structures that constantly interact with liquids and gases (that is, they must be impermeable and sealed);
- when using structures that are subject to more stringent requirements for their durability.
Having determined the type of defect and the need to fix it, it is much easier to choose than to repair holes in a wall or any other concrete surface.
Cement mortars
These compositions are very popular due to their low cost and the ability to repair minor shrinkage cracks in concrete.
Crack sealing
Before proceeding with repairing, it is necessary to check the crack itself for chips around it. If there are any, then in the near future they may turn into holes, so it is imperative to eliminate all flaking pieces of concrete. After that it is necessary:
- Perform jointing. To do this, using a chisel and a hammer, you need to walk along the entire length of the crack so that its depth is at least 5 mm. If necessary, you can use a spatula to create a depression.

- remove dust with a vacuum cleaner and rinse the formed cavity with water.
- Remove excess water and cover the crack with cement mortar (3 parts of sand to 1 part of cement with the addition of PVA). In this case, you need to ensure that the composition covers the entire space of the recess.
- Moisten the poured cement with water.
Sealing the hole
If a hole has formed in the concrete surface, in which the reinforcement is visible, then the defect can be repaired as follows:

- Clean out the hole in the concrete and treat its surface with an anti-corrosive compound.
- Place pieces of steel wire with a diameter of about 4 mm in the recess.
- After that, the groove is covered with a primer, evenly applying it to the entire surface. In this case, the thickness of the mixture layer should be about 3 mm.
- Without waiting for the mixture to dry, fill the cavity with the cementitious concrete cracking mortar and make sure it fills the entire cavity. If the hole is too deep, then the cement is poured in several stages. In this case, each subsequent layer must be moistened with water from a spray.
- Level the surface with a rail (metal or wood) moving the tool from right to left.

- After the mixture has hardened, excess cement composition must be removed with a spatula and the surface must be plastered. If the crack was too deep, then leveling is carried out with a grinder.
Healthy! The cement composition must be poured with a margin so that it is slightly above the floor surface. In the process of hardening, the mixture will shrink.
After 24 hours, the concrete floor can be painted or any finishing material can be laid on it.
However, it should be borne in mind that such filling of cracks in concrete will not give a sealing effect and is not suitable for surfaces that have increased requirements for waterproofing. In addition, the cement composition can be considered as a temporary solution to problems. Sooner or later, defects will appear again. If you want to "overhaul" the holes and avoid their appearance in the future, then in this case you can seal the defects with resins, specialized repair compounds based on them, or sealant.
Long-term sealing of defects
When deciding how to repair cracks in concrete for a long time, you should pay attention to this method of processing defects. Resin and resin-based embedding mixtures are suitable for the restoration of screeds, blind areas and various concreted areas or horizontal surfaces.

Repairing cracks in concrete using such compositions has a number of advantages. First of all, it is the cheapness of the mixtures, as well as their quick drying. On the other hand, the resin allows the seams to be held securely in place and to keep them from enlarging later.
So, to eliminate defects, you will need to prepare:
- angle grinder and diamond-coated discs;
- a vacuum cleaner;
- spatulas and trough for diluting the composition;
- primer for concrete;
- Epoxy (base A and hardener B);
- Fine-grained sifted sand.

Before repairing a crack, you need to clean it of dust and dirt. After that, we carry out the embedding in the following sequence:
- We make the jointing of the crack. In this case, the width of the resulting recess must be at least 5 mm.
- With the help of a grinding machine, we cut transverse seams in concrete with a pitch of 400 mm (the length of the grooves is about 100-150 mm).
- We remove the loose layer of concrete and dust the surface with a vacuum cleaner.
- We treat the surface of the defect with a primer, and fix the transverse grooves with repair brackets.
- We prepare a solution from resin (base), hardener and sand according to the instructions on the package with the composition.
- We close the defect with the resulting mixture and quickly level the surface, since the setting time of the resin is only 10 minutes.
The best epoxies
If speak about the best materials for repairing cracks in concrete walls and other surfaces, the most effective today are:
- Epoxy resin of domestic production ED-16 and ED-20 costing about 2,000 per 3 kg. The hardener will have to be bought separately (it costs about 300-500 rubles).
- Epoxy 520 resin from the Czech manufacturer Spolchemie costing 3,500 rubles per 5 kg.
- The German composition UZIN KR 416, which will cost 2,700 rubles for 0.75 kg.

Also, formulations from Italian manufacturer Sika.
However, it should be borne in mind that this method of correcting defects is not suitable for treating holes that form in concrete foundations experiencing strong pressure from water. In this case, it is worth using a sealant.
Use of sealants and self-expanding tapes
It should be said right away that this method of sealing defects is very expensive, therefore it is most often used when repairing concrete bowls of country pools. However, despite its high cost, the use of sealant and self-expanding cords has its own advantages:
- the ability to handle any type of defect;
- complete tightness;
- the ability to carry out installation work in cold weather.
To work, in addition to the standard set of tools, you will need:
- assembly gun;
- self-expanding tape or cord;
- chisel and brushes;
- concrete sealant.
However, before covering up the flaw, it is necessary to measure the dimensions of the slots and purchase the required type of sealant and tapes, depending on this. For example, if the hole is 60 mm deep, an 18 x 23 mm cord will work.
The next step is necessary:
- Expand cracks and remove dust.
- Install the cord into the groove.
- Fill the rest of the space with sealant.
- Smooth out the compound that has come out with a spatula.

After completing the work, you do not have to guess how to putty the surface or caulk it. It is enough just to apply the composition and smooth it out.
If speak about best lineups of this type, the most popular are:
- Domestic ELASTOSIL PU 20 worth 280 rubles for 600 ml.
- Composition from the French manufacturer Rubberflex, which today is sold at a price of 300 rubles for 310 ml.
- PLUG tape Russian production costing about 260 rubles per running meter.
Injecting
Also, when deciding how to seal holes in a concrete wall in the most effective way, especially if not only a crack has appeared, but water also flows through it, you should pay attention to this method.
Injection technology involves the introduction of a special composition (polyurethane or epoxy resin, microcement or waterproofing mixture) into the concrete with the use of special injection pumps that create strong pressure.
To perform such a restoration of defects, it is necessary:
- Make staggered holes on both sides of the gap.
- Install packers in them (special pipes through which the solution is fed, resemble a dowel) at an angle.

- Pour in the solution.
- Pull out the tubes and coat the surface with the building compound.
So, we looked at how to independently repair a hole in a concrete wall, but what if we are talking about aerated concrete?
Features of sealing cracks in aerated concrete
Cracks in aerated concrete are formed as often as in conventional cement-sand monoliths. To seal them, work is performed in the following sequence:
- A layer of collapsed concrete is removed from the wall or any other aerated concrete surface. building material and it is cleaned from dust and dirt.
- The gap is primed. For this, it is recommended to use a 50% aqueous dispersion of PVA and water (ratio 1: 3).
- Cracks are filled in depending on their dimensions. If the damage is single and its width does not exceed 0.4 mm, then the gap is expanded to 10 mm and any building compound is poured into it (you can use cement or special glue for aerated concrete). If the width of the defect is up to 10 mm, then it is better to use a porous adhesive for sealing and widen the gap to 20 mm. In the event of a defect with a width of up to 20 mm, it is recommended to apply an adhesive or cement composition, having previously added coarse-graded crushed stone from aerated concrete to it.
After completing the work, it is necessary to close the treated surface with a sheet of plywood (secure with self-tapping screws) for 3-5 hours.
How and how to fix a crack in the wall correctly.
Cracks in the walls are one of the most important problems in apartment buildings and private houses. Because of such cracks, paint very often begins to crack and crumble, wallpaper peels off, and other troubles occur that I would like to get rid of. But cracks occur not only due to builders - it can also occur due to many natural phenomena, such as an earthquake, earth settling and others. You just need to understand that nothing is eternal, and the problem should be solved as it appears. But cracks can be very different - be it the initial stage or rather serious damage. But one conclusion should be made - it is necessary to close the crack in the wall as early as possible, so that later you do not have to invest more effort and money to eliminate this problem. It is better to cover up and close up "in the first couple" than to do it later.
How and how to fix a crack in the wall
You may encounter completely different cracks in size and origin. Perhaps your plaster or putty is just cracked, but if the cracks were caused by the brickwork itself, then this is already a more serious problem. But still, you can cope with the first and second options, you just need to know how to do everything correctly, that's all. Let's try to learn some methods that will help you get rid of cracks that have already appeared in the wall or.
 The putty mesh will help repair the crack in the wall.
If there are small cracks on your wall that look like a cobweb, then in order to cover it, you may need a primer (see) and a putty mesh. But remember, this option may only work if the cracks do not diverge and the wall has only minor damage. So, let's get down to business. First of all, it is necessary to clean off all old building materials and all kinds of debris that is on the surface from the wall. It is important that the wall is perfectly clean. Now that you have done this work, you need to prime the wall with deep penetration soil. After that, glue the reinforced filler mesh over the entire wall area. Remember that the mesh should cover the entire area of the cracked wall. After you have applied the mesh, you need to coat the surface with a small layer of putty on top. After complete drying, you need to sand the wall, after which you can start painting or wallpapering. Thus, it is easy and quick to repair a crack in the wall.
If you encounter such a problem when small cracks have gone from the outside of the wall, then you should do the same work as in the previous version of getting rid of cracks, but here there is still one caveat - choose Ceresit CT29 for the putty. Such a putty is designed specifically for outdoor use and does not need sanding, since it is reinforced by itself. Moreover, such a putty is very resistant to weathering, as it contains special adhesive additives.

If significant cracks have gone on your wall, not only on the plaster, but also on brickwork , then here it is worth resorting to another option of how to patch up a crack in the wall, since this problem is already more serious than in the previous options. First of all, you need to completely remove all old plaster from the wall. After you have cleaned the wall, you need to screw a special metal mesh for plaster, and after that apply a new layer of cement-sand plaster. But it is very important to remember that the mesh must be screwed over the entire surface area, thereby preventing new plaster from spreading, after which it will be possible to putty, paint, and so on.
 But it is worth starting to take drastic measures in the event that the crack in the wall has already begun to diverge a little.... In this case, you will have to pull the wall together so that it does not diverge further. It is necessary to tighten the crack with special metal plates. But before that, knock all the old plaster off the wall. It is not possible to knock down the plaster from the entire surface area, but only half a meter on either side of the crack, since the metal plate is usually attached one meter. After you knocked down the plaster, you need to clean the crack from solutions and other debris, then fill it with polyurethane foam. Now you can attach the plate. But there is an important point - when choosing a plate, you should definitely pay attention to the fact that it cannot bend easily, especially since it should not bend by hand - this is important. It is worth choosing a plate that is made of thick and high-quality metal.
The crack in the wall should be pulled together in three places, and this is only a minimum. If possible, then you can make four or five ties. But if you chose the first option, then the mandatory places of the screed are:
1. Above, while stepping back a little space from the ceiling.
2. Bottom, slightly stepping back from the floor.
3. In the middle.
You can screw the plates onto the most common self-tapping screws, after driving in the dowels, or you can push them onto bolts with a nut, punching through the plate. After you have made the screed, you can wind up a special metal mesh and see how it is done correctly with the video example, and if you are familiar with this, then get down to business accordingly, because now you will not say that you do not know how to repair a crack in the wall. Good luck!
A crack in the wall is a rather unpleasant phenomenon. Except that it spoils appearance at home, belittling his dignity, through the cracks in the walls such a precious winter period heat. Moisture can penetrate the house through cracks, which can lead to dampness and mold, which, of course, no one wants. So patching up a crack in a wall is not so much a matter of personal preference as it is a justified necessity.
Wall cracks can form for a variety of reasons. On this factors such as wall material, operating conditions and technology violations are influenced... For example, drywall walls often crack along the joints between the slabs. This is mainly the result of improper installation. Cracks in the brickwork of a new house are possible due to subsidence of the foundation, which also occurs as a result of errors in its construction. Cracks in the plaster are more often found on the facade of a building, but even here it is mainly the elementary violation of technology that is to blame. As you can see, most often problems such as the appearance of cracks and cracks in the walls are associated with a human factor. The best way to deal with cracks in your walls is to avoid them altogether. However, what can be done if the crack does appear? Let's discuss.
If you find a crack in the wall, try not to delay repairing it. The longer the delay, the larger the crack. The methods of sealing cracks, as well as the choice of materials to deal with them, are influenced by whether it is an external wall or an internal one, from which it is made and the scale of the cracks themselves.
When repairing cracks in walls, there are general rules:
- the crack should be sewn up - artificially widen its edges
- free the crack from construction waste and dust
- prime
- use reinforcing materials

In most cases, the crack must be expanded before repairing.

Clean and prime the walls of the cracks.
Sealing small cracks inside a building
What if there are small cracks in the plastered interior wall?
- First thing free the area near the crack from paint or wallpaper; oil paint can be chipped lightly on it by tapping or scraped off with a spatula; to make the wallpaper easier to remove, they are moistened with water
- Open up the crack; depending on the plaster material and the tools available, this can be done with a knife, trowel, straight screwdriver or small chisel
- Clean out the crack and the adjoining section of the wall and prime; let the primer dry
- Prepare a plaster mix, taking into account the manufacturer's instructions (indoors, mainly used gypsum plaster); when repairing small cracks, it is better not to use a mixture with a coarse fraction (starting putty), either a finishing putty or a special putty for joints and cracks, which is particularly durable
- Apply plaster composition on the crack, pressing it a little; remove excess mixture with a spatula
- After drying, the putty should be done plot processing sandpaper fine grain

Minor cracks are repaired with putty.
Cracks in plasterboard structures can be conventionally referred to as small cracks. The fact is that such cracks appear mainly at the joints between sheets and are rarely wider than one or two millimeters. But the length of such a crack can grow and reach its maximum, which is equal to the length of the drywall sheet itself. An unpleasant feature of repairing cracks in a drywall wall is that after restoration it is difficult to completely hide the place where the defect was. Quite a few craftsmen are able to fix the crack and putty this place so that the roller or bulge at the repair site is not visible. And if the problem area is painted, then the relief that has arisen at the place of the crack will become even more noticeable. A possible way out is gluing embossed wallpaper with a spreading pattern. Such a disguise will not allow you to see the lack of repair of cracks in drywall.
But how do you still repair a crack in a drywall wall?
- Sewing the crack, trying to deepen it a little; although it is important to exercise prudence in this case, nevertheless, the more space you clear, the more repair mixture you can apply and the more reliable the repair itself will be; we carry out the joining with a clerical knife
- If the wall is painted (as a rule, cracks in a drywall wall are more often found precisely if they are painted, and not when they are pasted over with wallpaper, since the latter partially inhibit the formation and propagation of cracks or simply distract attention with a colorful pattern), sand with sandpaper a few centimeters of the wall on either side of the crack
- Necessarily priming the walls cracks along with the "adjacent" area; let the primer dry
- We prepare the repair mixture and put it in the crack; for this we use a finishing putty or special compounds for joints of gypsum plasterboards - the second option is much more expensive, but also much more reliable
- Over putty apply a reinforcing mesh"Serpyanka" (or fiberglass); press the mesh against the wall with a spatula so that the putty appears through the cells, smooth the last with a spatula

After filling the crack with the repair mixture, a fiberglass mat (or serpyanka tape) is applied, which plays the role of reinforcement.
- After the first layer has dried, you may notice a slight shrinkage of the material, so you need applying a second, thinner layer of putty
- If you work with special putties for joints, keep in mind that after drying they become very hard and difficult to grind, therefore, at the first stage of puttying, deliberately do not remove the layer flush with the wall plane; the final layer is best done from a regular finishing putty
- Thoroughly dried filler we clean with sandpaper, first with coarse, and then with fine grain; we try to fuse the influxes that protrude beyond the common plane of the wall
- Upon completion of the above-described works, we once again prime the repaired section of the wall for better adhesion of the finishing decorative coating
Sometimes cracks appear at the seams between ceramic tiles ... This can happen if the grouting was done before the adhesive has completely hardened and dried. In this case, lubrication from above with any composition is also not suitable. With such a repair, all seams are thoroughly cleaned of old grout. Yes, exactly all the seams, and not just those on which cracks appeared. Why? Even if you purchase the exact same grout, or you still have it after renovation, the color of the freshly applied grout may differ markedly from the one applied earlier. During operation, whether we like it or not, the color of the grout changes - it brightens, darkens, turns yellow, and so on. Therefore, it is better to immediately change the grout on the entire wall or even in the entire room.
The seams can be cleaned with different tools: a knife, a spatula, a flat screwdriver. Avoid jerky movements and exertion. This kind of work requires patience and perseverance. After the seams are cleaned, rinse them with water. Then, following the manufacturer's instructions knead the joint mortar and lay it with a rubber spatula. After drying (whitish stains will appear on the tiles), remove excess with a damp (not wet!) Natural soft cloth.
How to close large seams
Ordinary putty will not help in sealing large cracks. Such cracks often appear on the main walls of their brick or concrete. How can we cope with them?
We already remember that the crack must be well prepared before repairing. We clean out all unnecessary, if necessary, we embroider the edges and prime. If you have to work with a cement-sand mixture, it will be enough just to moisten the walls of the crack well with water.
Simple and fast way sealing large cracks is use of polyurethane foam... It will not only perfectly fill all the voids and inside the cracks, but also serve as a good heat insulator, because a lot of heat is lost through the cracks in the outer walls. Before pouring the foam, the walls of the crack also need to be well moistened with water, which improves the adhesion of the material to the base. But it is important to remember that the foam must not be left unprotected. She is afraid of ultraviolet radiation and other atmospheric influences. It needs to be plastered or putty with a facade putty. In addition, this repair method is used if the crack is vertical. For horizontal cracks, the repair material must be able to withstand the pressure of the part of the wall higher than the crack. Polyurethane foam, of course, it will not cope with such a load. So before pouring the foam, pieces of brick or concrete are laid in the cracks.

Polyurethane foam is often used to seal cracks and crevices in walls.
Sometimes large cracks are repaired cement mortar... They try not just to put it into the crack, but to throw it, as in plastering, so that the solution sticks to the walls of the crack. Of course, this is possible if the crack width allows it. In this case, pieces of brick or concrete are inserted into the crack, and the mortar continues to be thrown.
If the crack is quite large and wide (and maybe through), they do not throw in the solution, but pour it. For this, formwork is erected. How might it look like? Below, at the base of the crack (if it is vertically directed), a board (or a row of boards) is fixed so that it completely overlaps the width of the crack and lies 10-15 centimeters on the sides of the crack. You can fix the board using ordinary dowels and self-tapping screws. Then the solution is poured. When its level rises, the next board is sewn on, and so on, until the entire crack is filled with mortar to the top. As a filler, you can use all the same pieces of brick or concrete. When pouring in this way, try to tamp the mixture with a suitable metal rod or stick. Also, the solution settles well and becomes compacted if you knock on the wooden formwork with a hammer.
Repaired façade cracks look like facial scars. After renovation, it would be good to apply some kind of coating to the entire surface of the wall, and possibly the entire house. Of course, this can be a costly affair, but for that your house will look beautiful and well-groomed.
Sometimes, when cracks appear, it becomes necessary to putty or plaster the entire wall. To prevent recurrence of the problem , use a reinforcing mesh or fiberglass on the entire surface of the wall.

When repairing cracks indoors, use fiberglass or similar materials.
When using various sealants to seal cracks, remember that the greasy composition does not paint over silicone sealants. Acrylic sealant can be painted, however, it is inferior to silicone in elasticity and, most likely, will not be able to stretch if the crack grows.

Using a sealant to seal a crack in a wall.
Plastering the wall with cement mortar is also carried out using a reinforcing mesh, but it must be metal. For large cracks, it is allowed installation of restraining tires... For this, metal strips are attached with anchors to the wall, placing them perpendicular to the crack path. Then this structure can be plastered.

Use mesh reinforcement.
Remember, you cannot save on repairing cracks. Use the best and most reliable means. Consult, ask for help.
Be careful and careful! If a crack in the load-bearing wall grows and you are unable to contain it, seek professional help. It is possible that living in such a house becomes unsafe.